Strivacity’s Journey-flow API for native clients allows a brand’s developers to leverage all of the power of Strivacity login and registration flows inside of their native mobile and web applications. Brands can achieve this while their developers maintain full control of the presentation layer code. Strivacity provides SDKs to enable developers to implement into their native applications.
Why SDKs are preferred over direct API integrationStrivacity SDKs handle flow orchestration (screen → form → screen), token lifecycle + PKCE, redirects/fallbacks, and widget semantics. Your frontend stays decoupled from backend flow logic: if policies or steps change (for example, adding MFA), the app keeps working without redeploying.
Bottom line: SDKs are secure, maintainable, and future‑proof as your flows evolve.

Comparison of SDK and direct API integration approaches
| SDK | Headless SDK | Direct API | |
|---|---|---|---|
| Framework for user session handling and flow control | ✅ | ✅ | ⛔ |
| Policy-driven component rendering support | ✅ | ⛔ | ⛔ |
This documentation describes the direct API integration approach. While we recommend using the Strivacity SDKs (headless or web/mobile) whenever possible, you can use the following guidance if you need to implement a direct integration.
Key concepts
Each journey is a stateful sequence of screens driven by the Strivacity backend. Clients fetch the current screen, render its forms natively, and post form submissions back to advance the flow.
- Screens: Encapsulate one or more forms and their widgets.
- Forms: Contain user inputs to be collected (username, password, etc.).
- Widgets: Typed elements (input fields, checkboxes) for rendering.
- Fallback URL: If a client cannot render a step, a web-hosted fallback URL (
hostedUrl) is provided.
How to configure in Strivacity
The Journey-flow API is implemented by adding the client for OIDC using the Journey-flow API to an existing application.
To configure in the Strivacity admin console:
-
Go to Applications > (your application) > Clients > Create client.
-
Select the OIDC using the Journey-flow API client type.
-
Configure the client according to your needs (see configuring Clients for more information).
-
Be sure to include a callback URL in the client configuration to point back to the application.
-
This client is already configured to support the OIDC PKCE flow, which is required to use this API.
Once that client has been configured and saved, you are ready to begin incorporating it into your native application.
How to use the API
Initialize an OIDC flow
Strivacity's Journey-flow API begins with an OIDC PKCE flow.
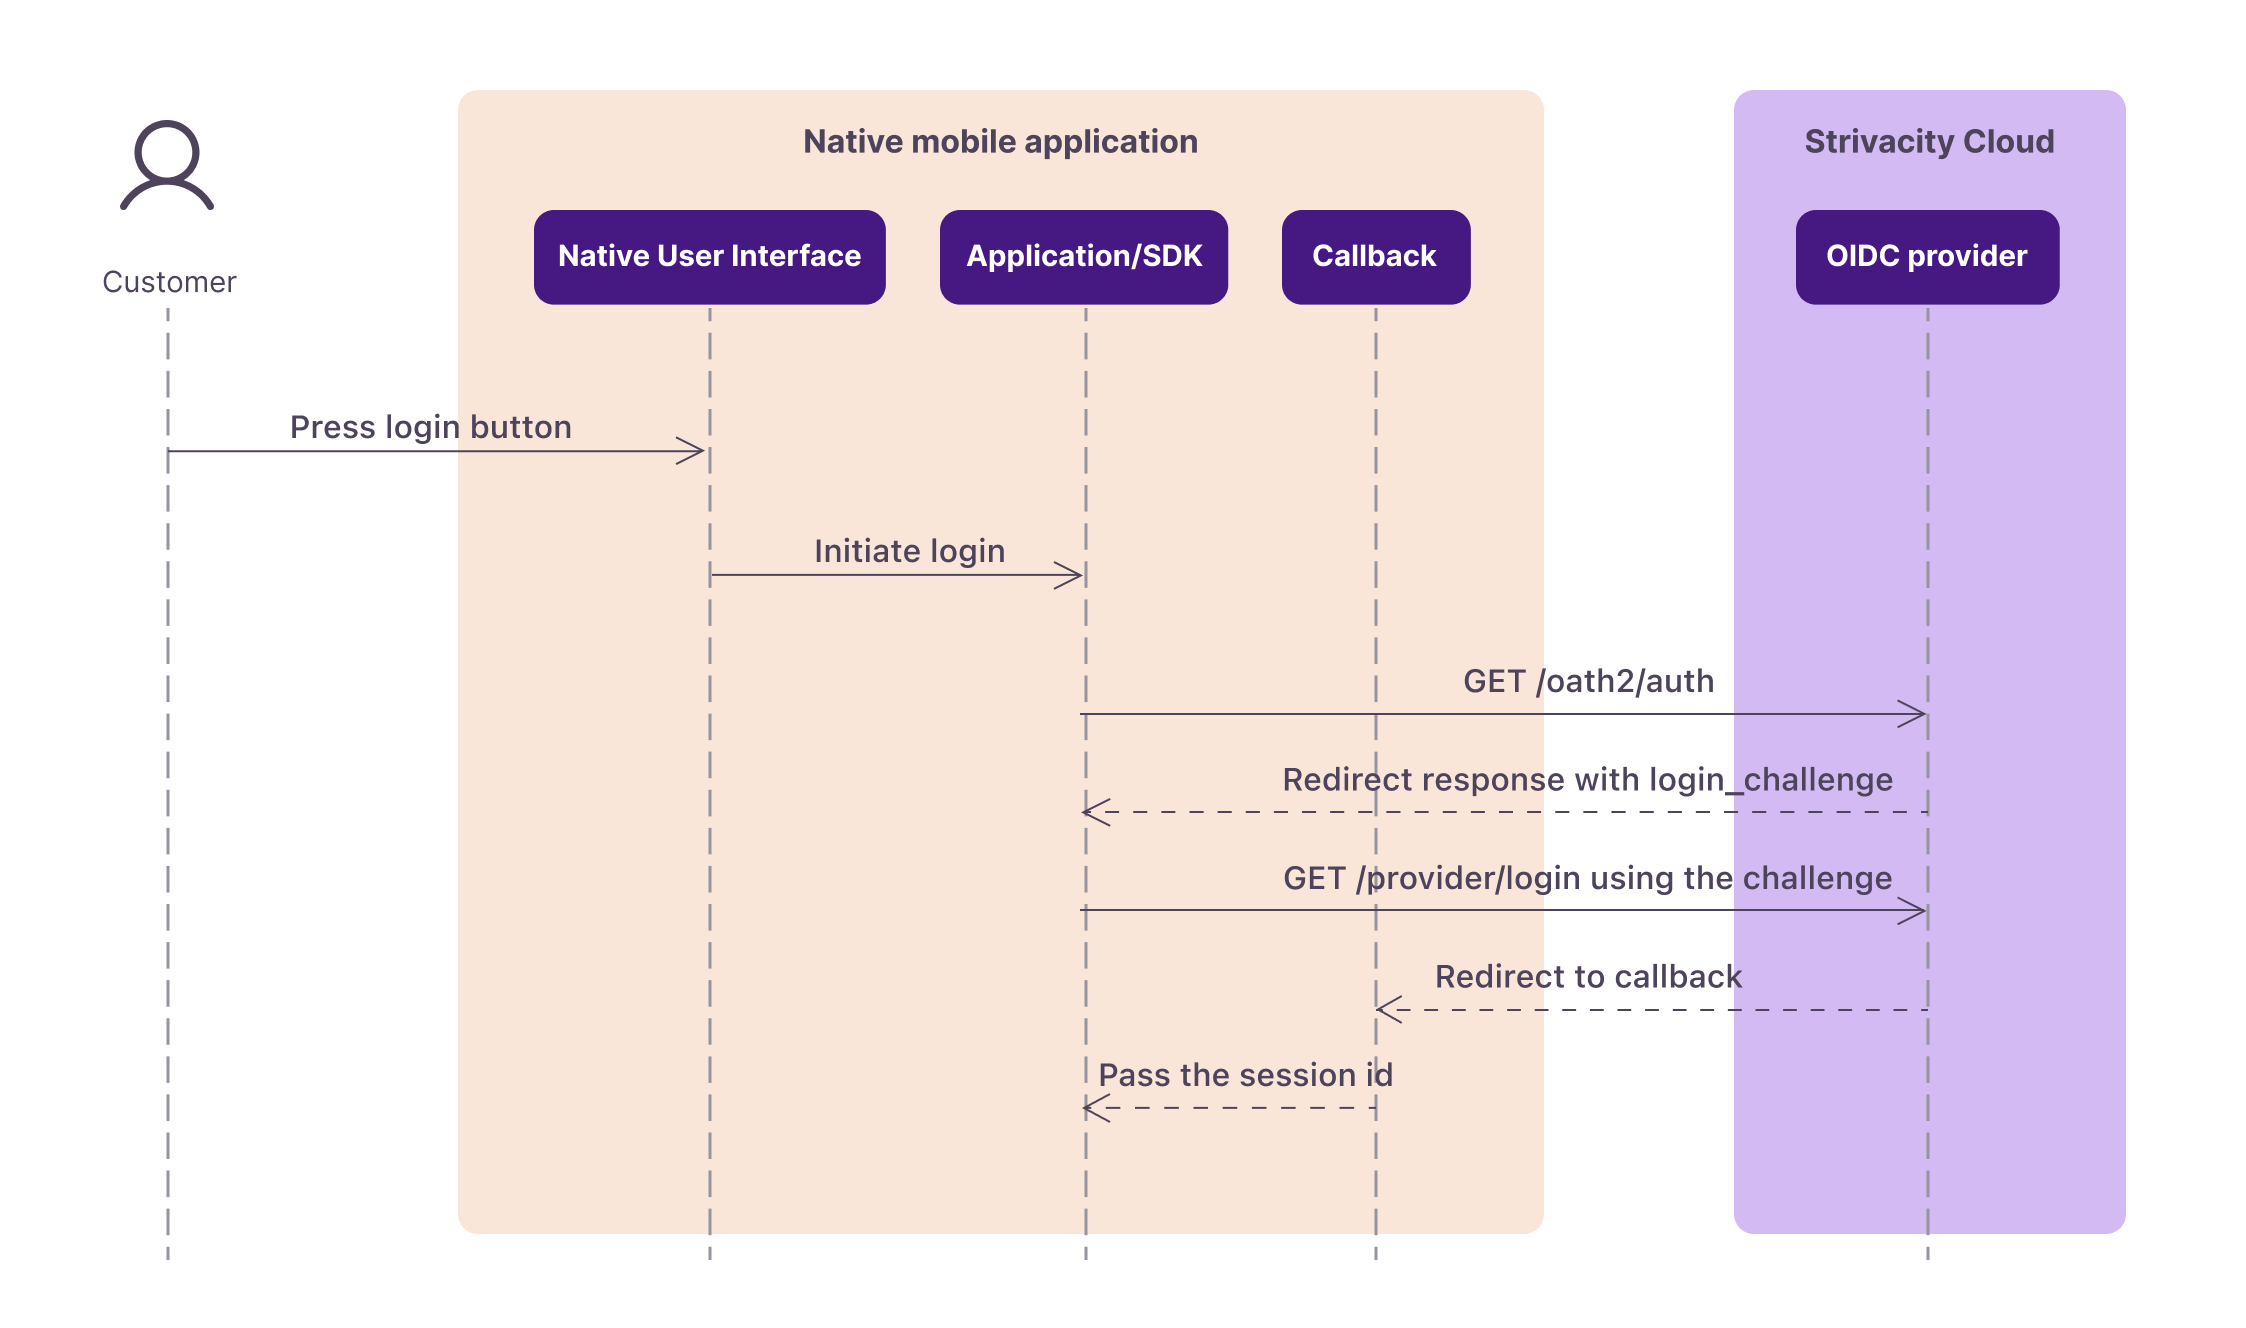
Sequence diagram showing how an OIDC flow initializes between the native application and Strivacity
Start the journey
Call the init API to start a new session and receive the initial Screen.
POST /flow/api/v1/initRender and collect input
Each screen includes one or more forms with typed widgets (input, password, select, etc.). Render these natively, collect values by widget id, apply validators, and surface any messages.global.
Submit forms
Advance the flow by posting the collected values to the form endpoint for the current formId.
POST /flow/api/v1/form/{formId}Handle validation & errors
If validation fails, the response includes messages.global (e.g., “Incorrect password”). Display these to the user.
Complete the journey
When complete, the Screen includes a finalizeUrl you can follow to finalize the authorization and obtain your token.
Reset when needed
Reset the journey to the initial state:
POST /flow/api/v1/form/resetScreen model (reference)
| Field | Description |
|---|---|
screen | Name/ID of the current screen |
forms | Array of forms to render |
layout | Layout guidance |
message | Error/success feedback |
hostedUrl | Web fallback URL |
finalizeUrl | URL to finalize the flow (if present) |
branding | Visual configuration for the current screen, such as colors, logos, and styling defined by the active branding policy. |
Forms
forms is an array of widget elements such as:
input,password,select,checkbox,static,submit
Falling back to no-code components
For brands that prefer to use no-code components rather than building their own native experiences, or when the native application encounters any functionality it doesn't understand, it can redirect to the fallback URL provided in the response to start or finish the flow using no-code components instead of native user interfaces.
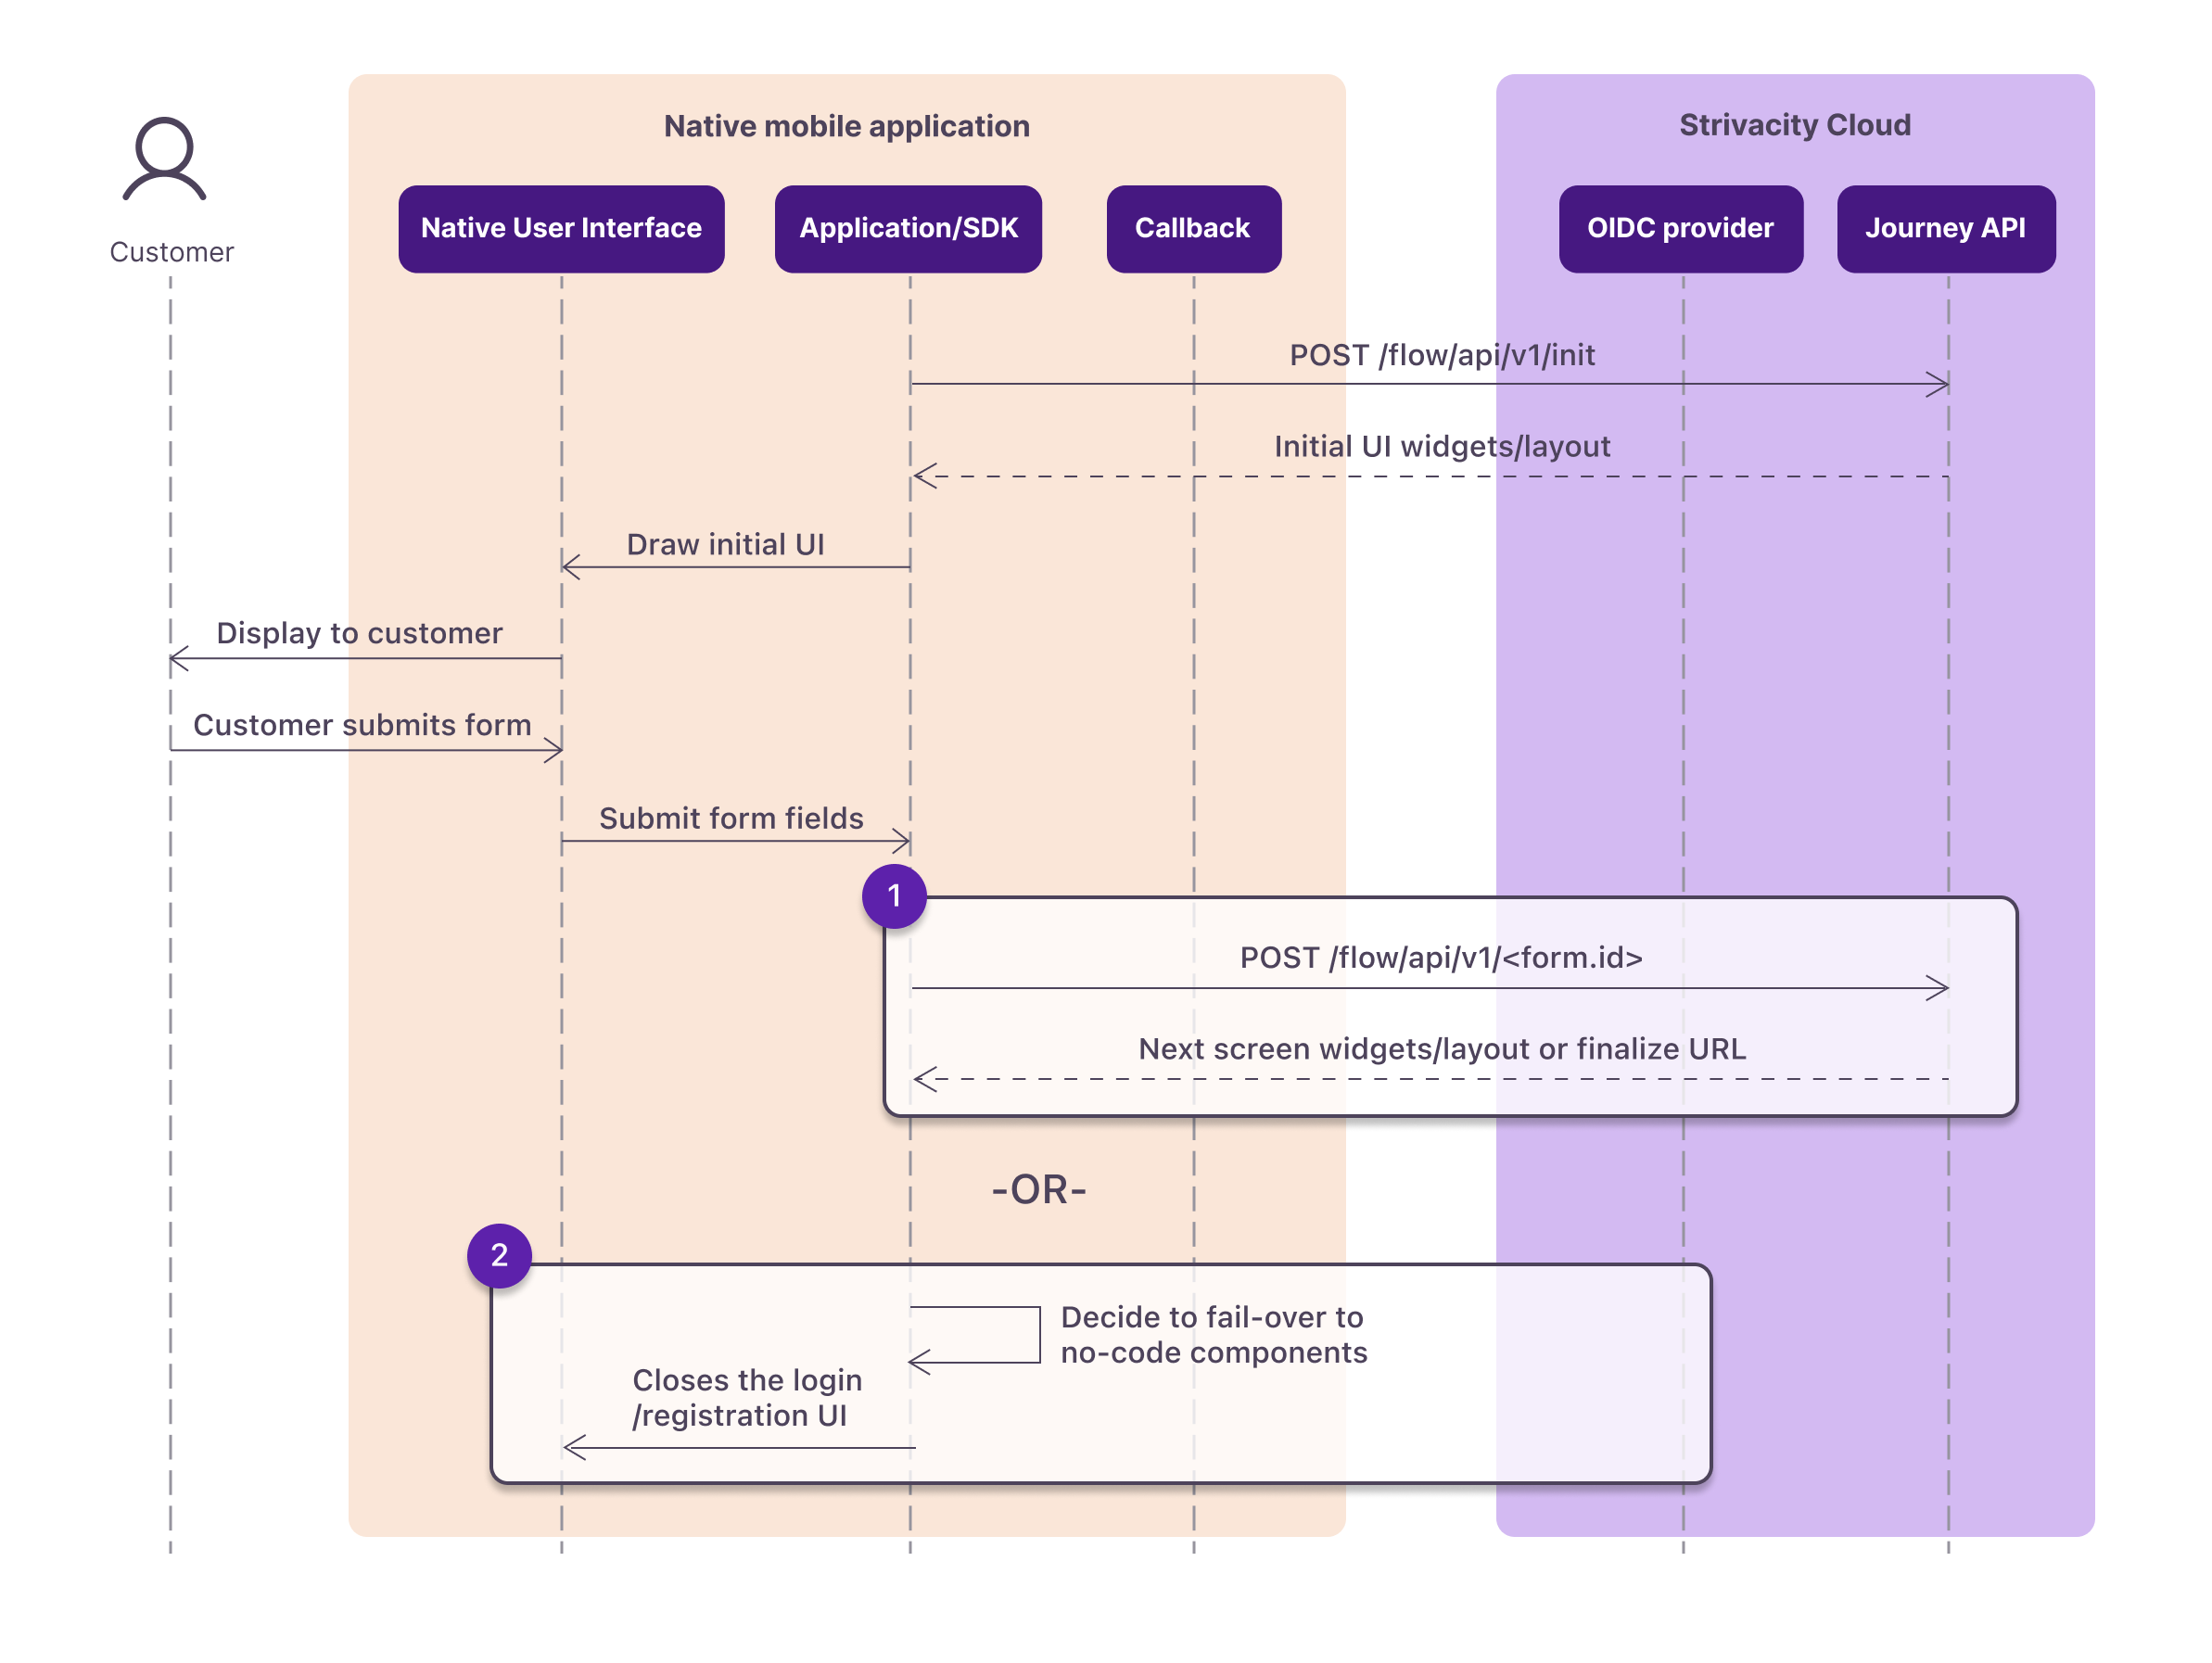
Flow diagram showing how a native app decides to fail over to Strivacity’s no-code components during login or registration
No-code components flow
In this flow, the web view in the native application displays no-code components to the customer who interacts with the hosted login until the flow is complete and a code token is returned.
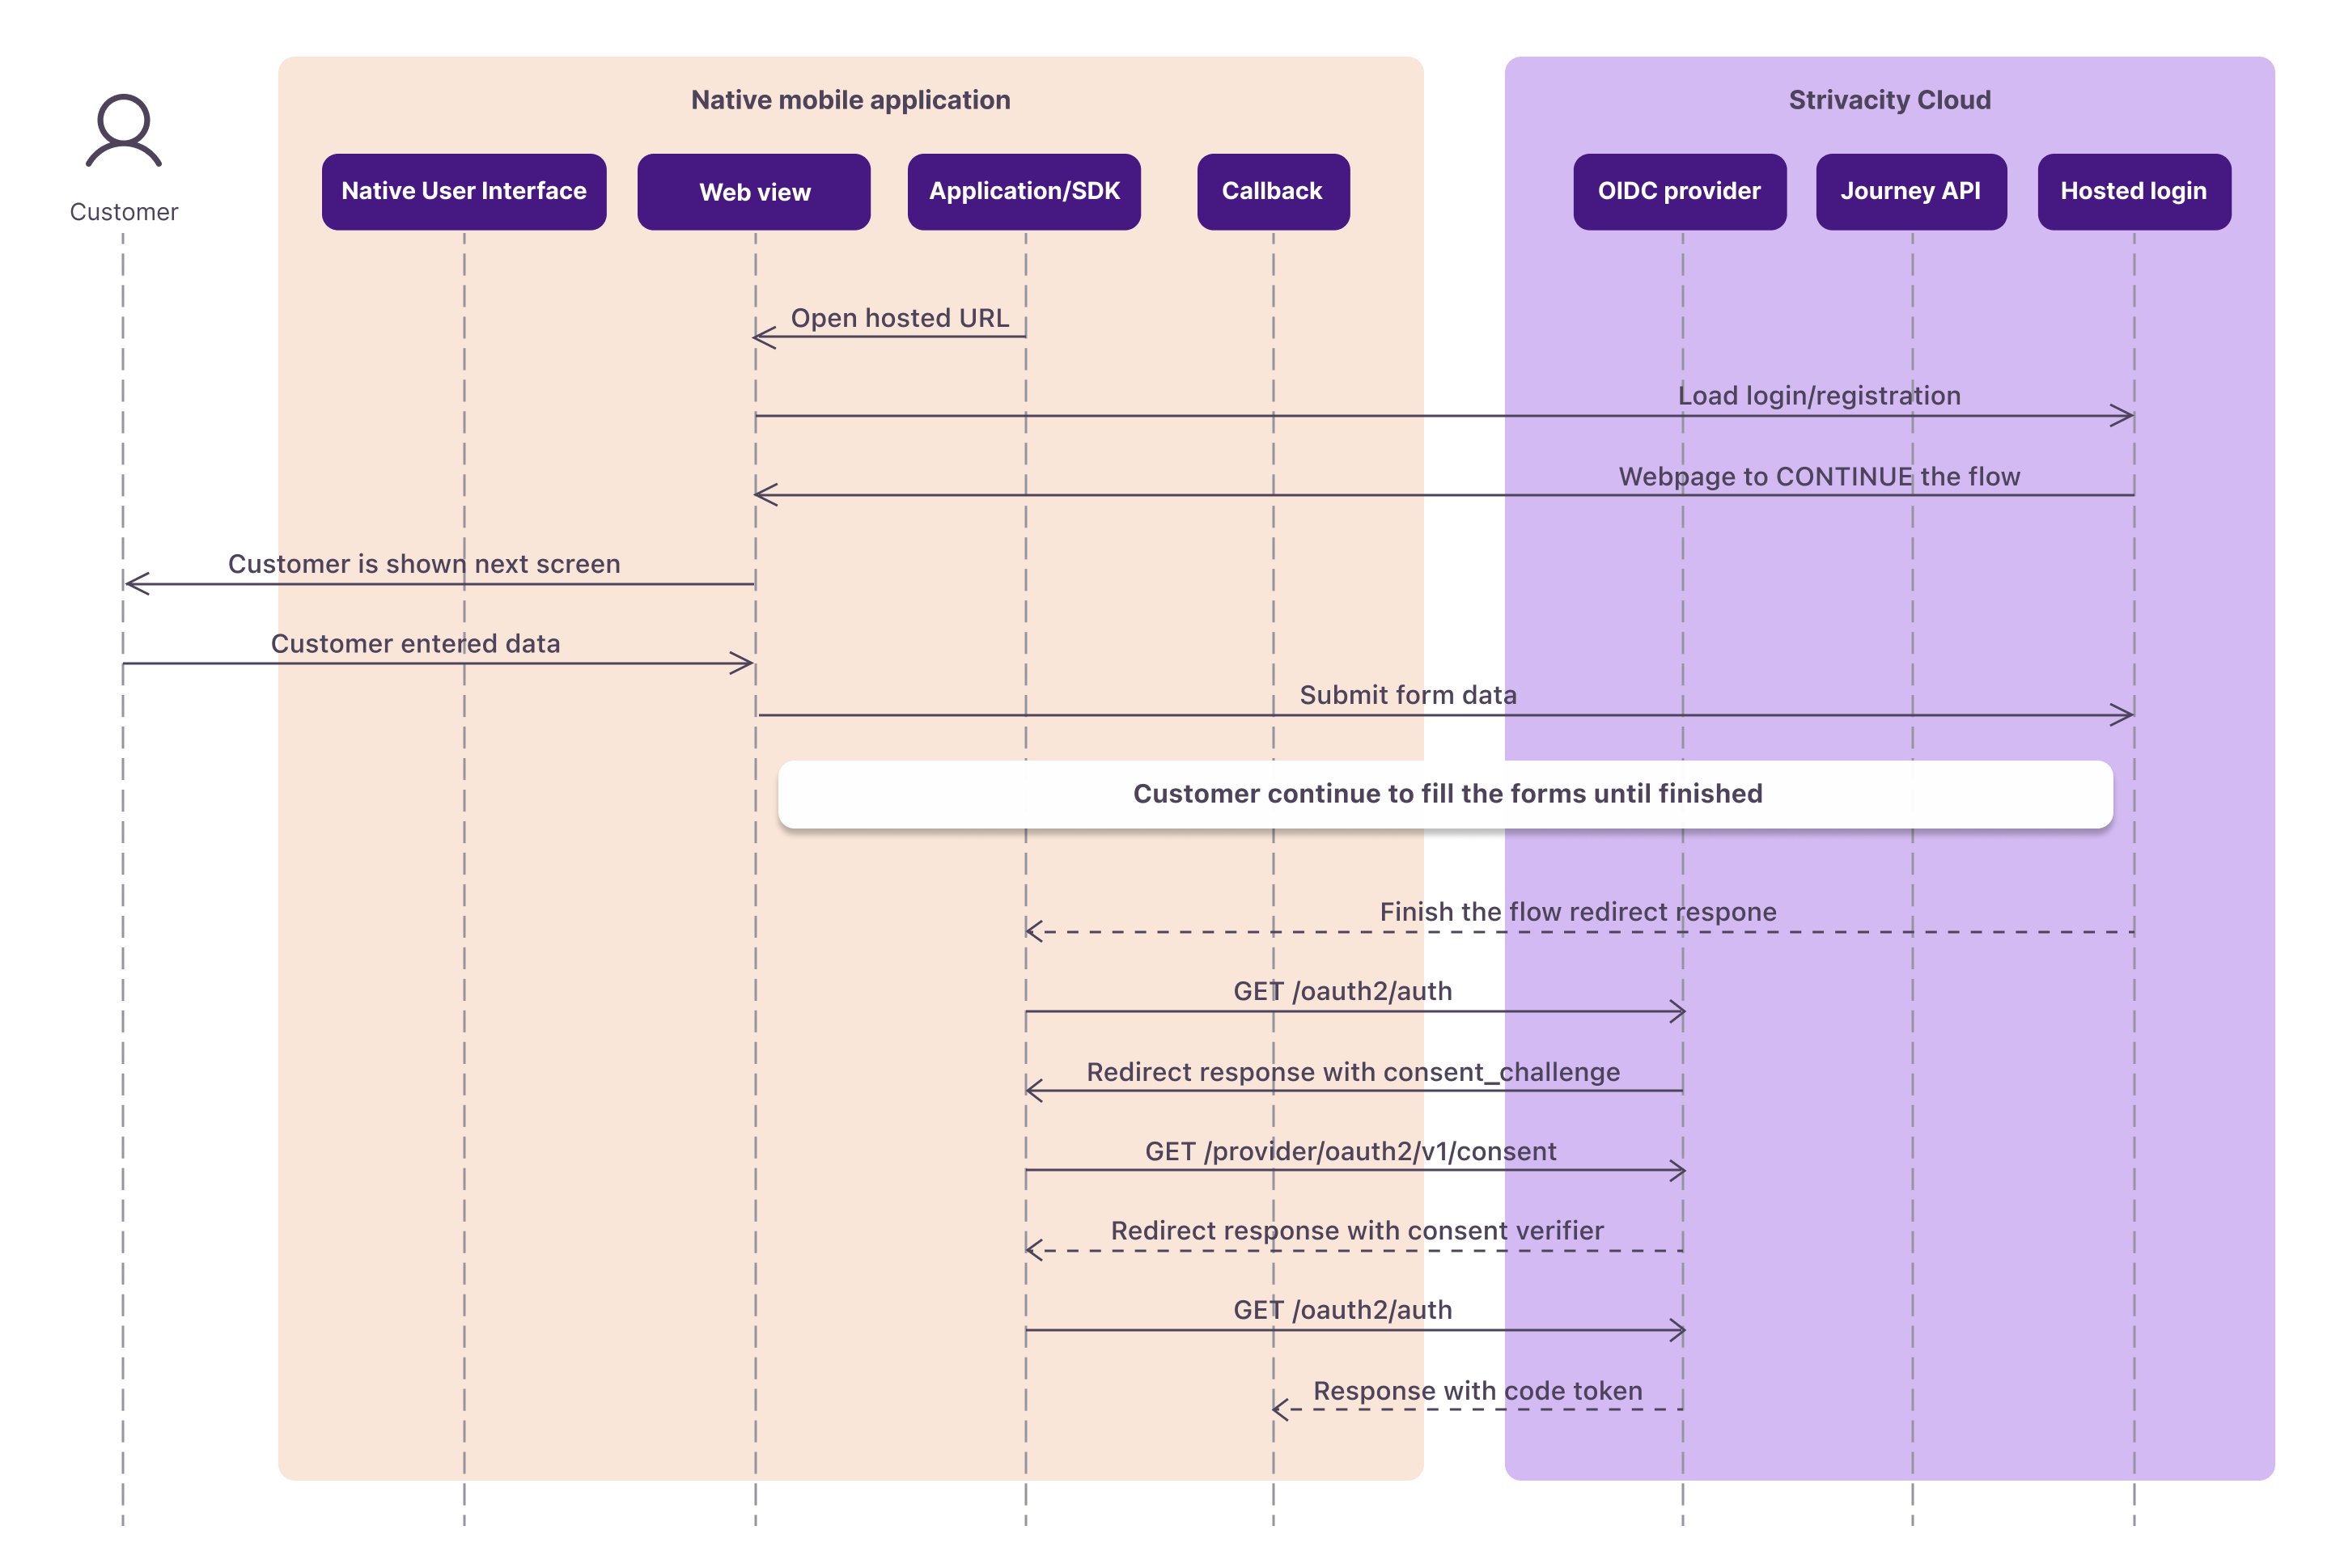
Sequence diagram showing how the login or registration flow continues in a web view using Strivacity’s no-code components
Native API HTTP call breakdown
While Strivacity provides this API primarily for use via its native SDKs, it is possible (though complex) to call it directly. The SDKs handle important details like OAuth2 PKCE flow, token storage, and evolving flow logic automatically . If you choose to integrate directly with the Journey-Flow API, you must manually orchestrate each step as described below.
Step 1: GET /oauth2/auth
/oauth2/authInitiate OIDC authorization
GET https://{{tenant}}/oauth2/auth
  ?client_id={{clientId}}
  &redirect_uri={{redirectUrl}}
  &scope=openid
  &response_type=code
  &response_mode=query
  &code_challenge_method=S256
  &code_challenge={{code_challenge}}
  &state={{state}}
  &nonce={{nonce}}
Purpose: This step initiates the OAuth2/OIDC authorization code flow (with PKCE) for the Journey. It starts the login/registration authorization process for the native client.
You must supply the required query parameters, including your:
client_id,redirect_uri,scope(for example,openid),response_type=code,response_mode(typically=query),code_challenge(PKCE),code_challenge_method(S256),- a random
stateandnonce. These parameters identify your OIDC client and establish the PKCE challenge.
There is one optional parameter that prevents branding, layout guidance, and rendering assets from being included in the response payloads from Strivacity to the native client.
Valid parameters include:
sdk=websdk=web-minimalsdk=ios-minimalsdk=android-minimal
Required headers/params: No authorization header is needed for this initial call. Ensure all required query params are present (as shown above).
Handling the response: The /oauth2/auth endpoint will redirect (HTTP 302) the client to the identity provider’s login URL. You will not get a JSON body here; instead, check the HTTP response’s Location header. That URL is the next step in the flow (often a Strivacity login provider URL). Your client should capture this Location URL (we’ll call it loginProvider). In a direct integration (outside the SDK), you need to follow this redirect manually in code.
const loginProvider = response.headers.valueOf('Location');Step 2: GET /provider/login
/provider/loginFollow redirect to Get Session
GET {{loginProvider}}Purpose: This step follows the redirect from the previous step. The loginProvider URL obtained from /oauth2/auth is requested next. This will redirect again, ultimately providing a Journey session identifier. Essentially, it sets up a user session for the Journey-Flow in Strivacity.
Required headers/params: No special headers (use cookies if any were set, though in this flow the session is passed via query parameter). Perform a GET on the URL from step 1.
Handling the response: Depending on the sdk mode.
- Default SDK mode (undefined,
ios-minimal,android-minimal)- HTTP 302 Redirect to the native URL.
- Web SDK mode (
web,web-minimal)- HTTP 200 OK response body with the native URL in it.
In both cases, the native URL will contain a session_id parameter.
For example, the URL might look like:
https://<tenant>/.../nativeLogin?session_id=<sessionId>&...Extract the session_id value from that URL and save it. This session ID is a temporary token that authenticates subsequent Journey API calls. Moving forward, you will use Authorization: Bearer <sessionId> for the Journey-flow API endpoints, including the calls that initialize, advance, and finalize the journey.
const nativeUrl = new URL(response.headers.valueOf('Location'));
const sessionId = new URLSearchParams(nativeUrl.search).get('session_id');At this point, the OIDC authorization flow has handed off control to the Journey-Flow API (via the session). All further interactions will be REST API calls using this session token until we finalize and obtain the actual OAuth2 tokens.
Step 3: POST /flow/api/v1/init
/flow/api/v1/initStart the journey flow
POST /flow/api/v1/init HTTP/1.1
Host: {{tenant}}
Authorization: Bearer {{sessionId}}
Purpose: This step initializes a new Journey flow session and retrieves the initial screen definition from Strivacity. This is the first call directly to the Journey-Flow API proper, and it returns the UI data needed to render the first step of the login or registration journey. Essentially, it “starts the journey” by returning a JSON payload describing what to show the user (for example, a login form or choice).
Required headers/params: Include the session token from step 2 in an Authorization header: Authorization: Bearer <sessionId>. No request body or other parameters are needed for this call.
Handling the response: A successful call returns information representing the current screen in the journey. This information is contained in the location header, unless the “SDK-minimal” parameter is passed, where it is passed via the response body.
forms: an array of form objects (each with an id and input widgets to render).messages: any informational or error messages,layout: layout or UI hints,screen: the screen’s name or identifier, andhostedUrl: a fallback URL to Strivacity’s hosted web UI for this step.
For example, the initial screen might contain a form with an input for “identifier” (username/email) and a submit button. Your app should interpret this to build a native UI: render the provided widgets (text fields, checkboxes, etc.) and display any messages. If your app ever encounters a widget or screen it cannot render, you can use the hostedUrl to defer to Strivacity’s web UI as a fallback.
Step 4: POST /flow/api/v1/form/identifier
/flow/api/v1/form/identifierSubmit user identifier
POST /flow/api/v1/form/identifier HTTP/1.1
Host: {{tenant}}
Authorization: Bearer {{sessionId}}
Content-Type: application/json

{
  "identifier": "[email protected]"
}
Purpose: This step submits the user’s identifier (username or email) to the Journey API to identify the account. After rendering the initial screen and collecting the user’s input for their login identifier, you advance the flow by POSTing to the provided form endpoint. In our example, the form ID was “identifier”, so the endpoint becomes /flow/api/v1/form/identifier. This tells Strivacity which account is attempting to authenticate (or register).
Required headers/params: Use the session token in the Authorization: Bearer <sessionId> header. Set Content-Type: application/json. The body should be a JSON object containing the identifier field and value.
Make sure the JSON key exactly matches the widget ID from the screen definition (in this case, “identifier”) and the value is what the user entered.
Handling the response: The response will be another Screen JSON payload, now representing the next step in the journey. If the identifier was recognized and the flow continues, this might be the password entry screen (with a form ID like “password”) or possibly an MFA selection if the user has MFA, etc. If the identifier was not recognized or some validation failed, the response’s messages.global may contain an error message (e.g., “Account not found”). In that case, you would still receive a screen payload (likely the same identifier screen again) with the error message. Your app should display the message and prompt the user to try again or register. If successful, proceed to render the next form from the response (for example, ask for the password).
The exact form ID and sequence can vary depending on your Strivacity Journey configuration. “Identifier” is the typical first step for login flows. In a registration flow, the first form might be a “registration” form collecting name, email, etc., which would be handled similarly (see Registration below).
Step 5: POST /flow/api/v1/form/password
/flow/api/v1/form/passwordSubmit password
POST /flow/api/v1/form/password HTTP/1.1
Host: {{tenant}}
Authorization: Bearer {{sessionId}}
Content-Type: application/json

{
  "password": "{{password}}"
}
Purpose: This step submits the user’s password (or other credentials) for authentication. After the user enters their password on the password screen, you advance the flow by POSTing to the password form endpoint (e.g., /flow/api/v1/form/password). This verifies the user’s credentials against the identified account.
Required headers/params: Continue to include Authorization: Bearer <sessionId>. Use Content-Type: application/json. The JSON body should include the password field with the user’s input.
As before, the JSON key (“password”) must match the form’s expected field name.
Handling the response: The response will depend on the outcome and any additional steps required:
- If the password is incorrect, the API will return a
ScreenJSON for the password step again, with an error message inmessages.global(for example, “Incorrect password”). Your app should display the error and allow retry (by posting to the same/passwordendpoint again with a new value). - If the password is correct and no further authentication is needed, the response will include a special URL in the payload called
finalizeUrl. The presence of afinalizeUrlindicates that primary authentication is complete. The flow is now ready to finalize the OIDC process and retrieve tokens (see step 6). - If the password is correct but additional steps are required, you will get a Screen for the next step instead of a
finalizeUrl. For example, if the user must perform multi-factor authentication, the next screen might describe available MFA options (with a form ID likeselectFactor). In that case, you would continue by calling the relevant form endpoint (for example,/flow/api/v1/form/selectFactorto choose an MFA method, then another call to submit the OTP/PIN). Handle those steps similarly: render the prompt natively, collect input, and POST to the given form endpoint. Once all required steps (MFA, consents, etc.) are successfully completed, afinalizeUrlwill be provided in the response of the last step.
In our simple flow example, after a correct password, the response contains finalizeUrl, meaning we can proceed to complete the journey.
const finalizeUrl = response.body.finalizeUrl;Step 6: GET finalizeUrl
finalizeUrlComplete the OAuth flow
GET {{finalizeUrl}}Purpose: This step finalizes the OIDC authorization by visiting the finalizeUrl obtained from the previous step. Essentially, this is the equivalent of the browser being redirected to the OAuth redirect_uri with an authorization code (or to a consent page, if applicable). Your task is to follow the finalizeUrl to complete the login.
Required headers/params: For native and API integrations, include the session token in the Authorization: Bearer <sessionId>header when calling the finalizeUrl. The endpoint also accepts the session via the __Session cookie for browser-based flows, but cookies are not required. If both an authorization header and cookie are present, the authorization header is used.
For native and other non-browser clients, you should not rely on cookies. Always send
Authorization: Bearer <sessionId>when calling thefinalizeUrlto complete the journey.
Handling the response: The finalizeUrl will respond with an HTTP redirect, directly to your originally provided redirect_uri with an authorization code appended (for example, redirect_uri?code=<authCode>&state=<state>). In this case, you have successfully authenticated; capture the code from the redirect. (In a mobile app scenario, this redirect would be caught by your app’s URL scheme or redirect URI handler).
The end result will be an authorization code issued to your redirect URI. At this point, the Journey-flow portion is done; the user is authenticated, and an auth code has been generated. The remaining step is to exchange this code for tokens.
Step 7: POST /oauth2/token
/oauth2/tokenExchange authorization code for tokens
POST /oauth2/token HTTP/1.1
Host: {{tenant}}
Content-Type: application/x-www-form-urlencoded

grant_type=authorization_code
&client_id={{clientId}}
&code_verifier={{codeVerifier}}
&code={{codeToken}}
&redirect_uri={{redirectUrl}}
Purpose: This call obtains the final OAuth2 tokens (access token, ID token, etc.) by exchanging the authorization code. It’s the standard OAuth2 Token Endpoint request for the Authorization Code flow.
Required headers/params: No Journey session token is needed here; this is a direct call to the OAuth2 token service. Use Content-Type: application/x-www-form-urlencoded. Include the following form fields in the body:
grant_type=authorization_codeclient_id=<yourClientId>(the same ID used in step 1)code_verifier=<yourPKCE_code_verifier>(the plain PKCE verifier string corresponding to the challenge sent in step 1)code=<authCode>(the authorization code you obtained in step 6)redirect_uri=<redirectUrl>(must exactly match the redirect URI used in step 1)
Handling the response: A successful response will be a JSON containing your tokens, for example: an access_token (for API calls), an id_token (if OpenID Connect, containing user identity claims), and possibly a refresh_token (if offline access is allowed). You should store these tokens securely (the SDKs provide secure storage; if doing it manually, ensure you follow best practices). From here on, use the access_token to authenticate calls to your protected resources or Strivacity’s APIs as needed. The user is now logged in to your app.
If the token call fails, check for error responses (for example, invalid code, PKCE mismatch, etc.). Common issues include the code already being used or expired, a mismatched redirect URI, or an incorrect verifier.
Additional actions and registration flows
The Journey-Flow API supports various other actions depending on your Journey configuration. Three notable ones are:
- Reset (POST
/flow/api/v1/form/reset): This endpoint resets the current journey, clearing any progress and starting over. It’s essentially a restart button for the flow. For example, if a user wants to cancel the login/registration or if the flow hits a state that needs to be re-initialized, you can call reset to return to the initial screen of the journey. The response will be aScreenJSON for the initial step again (equivalent to what/initreturns). After calling reset, you can safely start the identification process again or even choose a different flow path. Essentially, it wipes any temporary state (like an entered identifier or a partially completed registration) and gives you a fresh start within the same session. - Registration (POST
/flow/api/v1/form/registration): If your flow involves user registration, the initial call to/initmight return a screen where the user can choose to “Create Account” instead of login. In a registration scenario, you will eventually post the new user’s information to the /registration form endpoint (the form ID will be registration). This Registration Request call is used to send all collected signup data (for example, name, email, password, etc.) to Strivacity. Handling its response is similar to the login forms: you may receive another screen (for example, an email verification step or afinalizeUrlif registration completes). Often, registration flows require email verification, which brings us to the next action. - Send account activation (POST
/flow/api/v1/form/sendAccountActivation): This endpoint triggers an activation email to the user. It is typically called when a newly registered account needs to verify its email address, or if an existing account is in an “unverified” state and the user requests a new activation link. In a flow, you might see a screen telling the user their account isn’t activated and offering to “Resend activation email”, at which point the app should call this endpoint. It uses the current session (the user must have identified themselves, so the system knows which account to activate). No JSON body is required; just the session Bearer token. The response will likely contain a new screen or message (for example, confirming that the activation email was sent). The user would then check their email for a verification link as configured in your Strivacity policies.
When using these and other Journey API calls directly, always refer to the form ID provided by the previous screen to know the correct endpoint and JSON fields to use. The Strivacity Journey engine may present different steps (for example, password recovery screens, user consent forms, MFA enrollment, etc.) based on your configuration.
Each such step corresponds to a form endpoint (for example,
sendForgottenPasswordEmail,consent,passwordEnroll, etc.). The pattern is consistently POST/flow/api/v1/form/{formId}for submissions. Your application should be built to handle dynamic flow steps: read the forms and messages from each response and react accordingly.
Conclusion and best practices
Direct integration with the Journey-Flow API gives you full control over the user experience, but it requires careful handling of the flow state and OAuth2 details. Always maintain the security of the session token (sessionId) and ultimately the OAuth tokens. Wherever possible, leverage Strivacity’s provided SDKs or libraries, as they automatically handle PKCE, token lifecycle, redirect URIs, and flow orchestration in a secure manner. If you do proceed with a custom integration, use the above steps as a guide and test all branches of your user journeys (login success, failure, MFA, registration, account activation, resets) to ensure a smooth and secure user experience.