Bulk customer invitation
The bulk customer invite feature enables brands to quickly and efficiently invite multiple customers at once by uploading a CSV file with the necessary details. This is especially useful for brands providing B2B functionality, streamlining the process of sending invitations to large groups without the need for manual, one-by-one entry.
Use cases
- Enrolling a cohort of users into a learning management system for training.
- Inviting new team members to access a shared platform.
- By using the bulk customer invite feature, brand administrators can save time and effort while ensuring all necessary data is captured.
Configuration
- Accessing bulk invitations
- Navigate to Account management in the left-hand side menu on the Admin Console.
- Open the dropdown menu next to Invite customers and select Send bulk invitation.
- Preparing the CSV file
- Download a sample CSV file in the Upload invite list section to learn about the required format.
- The CSV includes a header row tailored to the schema of your selected identity store, ensuring all required attributes are clearly defined.
CSV requirements:- An email column must be included for the invitation's target.
- Any additional attributes (for example, given name, family name, address) must be included as key-value pairs in the remaining columns.
For details on exporting, importing, and formatting your CSV file for best results, see Exporting and importing CSV files below.
- Validating and uploading the CSV
After preparing the CSV, upload it through the Upload invite list section. Invitations are limited to 200 invitees per upload.
The system performs automatic validation:- Detects incorrect schemas or formatting issues.
- Flags errors and displays them to the administrator.
- Sending invitations
- Once the CSV passes validation, select the Send invites button.
- During the sending process, a modal displays the upload and processing status in real-time.
- Strivacity also checks whether an invitation has already been sent to any of the email addresses included in the uploaded CSV file. If a duplicate is detected, a warning message displays the previously sent invitation date. You can choose to skip the affected entries or send anyway and create a new invitation for those email addresses.
- Upon completion, the modal confirms the success or highlights any errors.
- Supported customizations
The bulk invitations UI allows administrators to define:- Language: Set the language for the invitations.
- Client: Specify the application client linked to the invitations.
- Groups: Assign customers to pre-defined groups.
- Organization and roles: Map the customers to an organization and assign relevant roles.
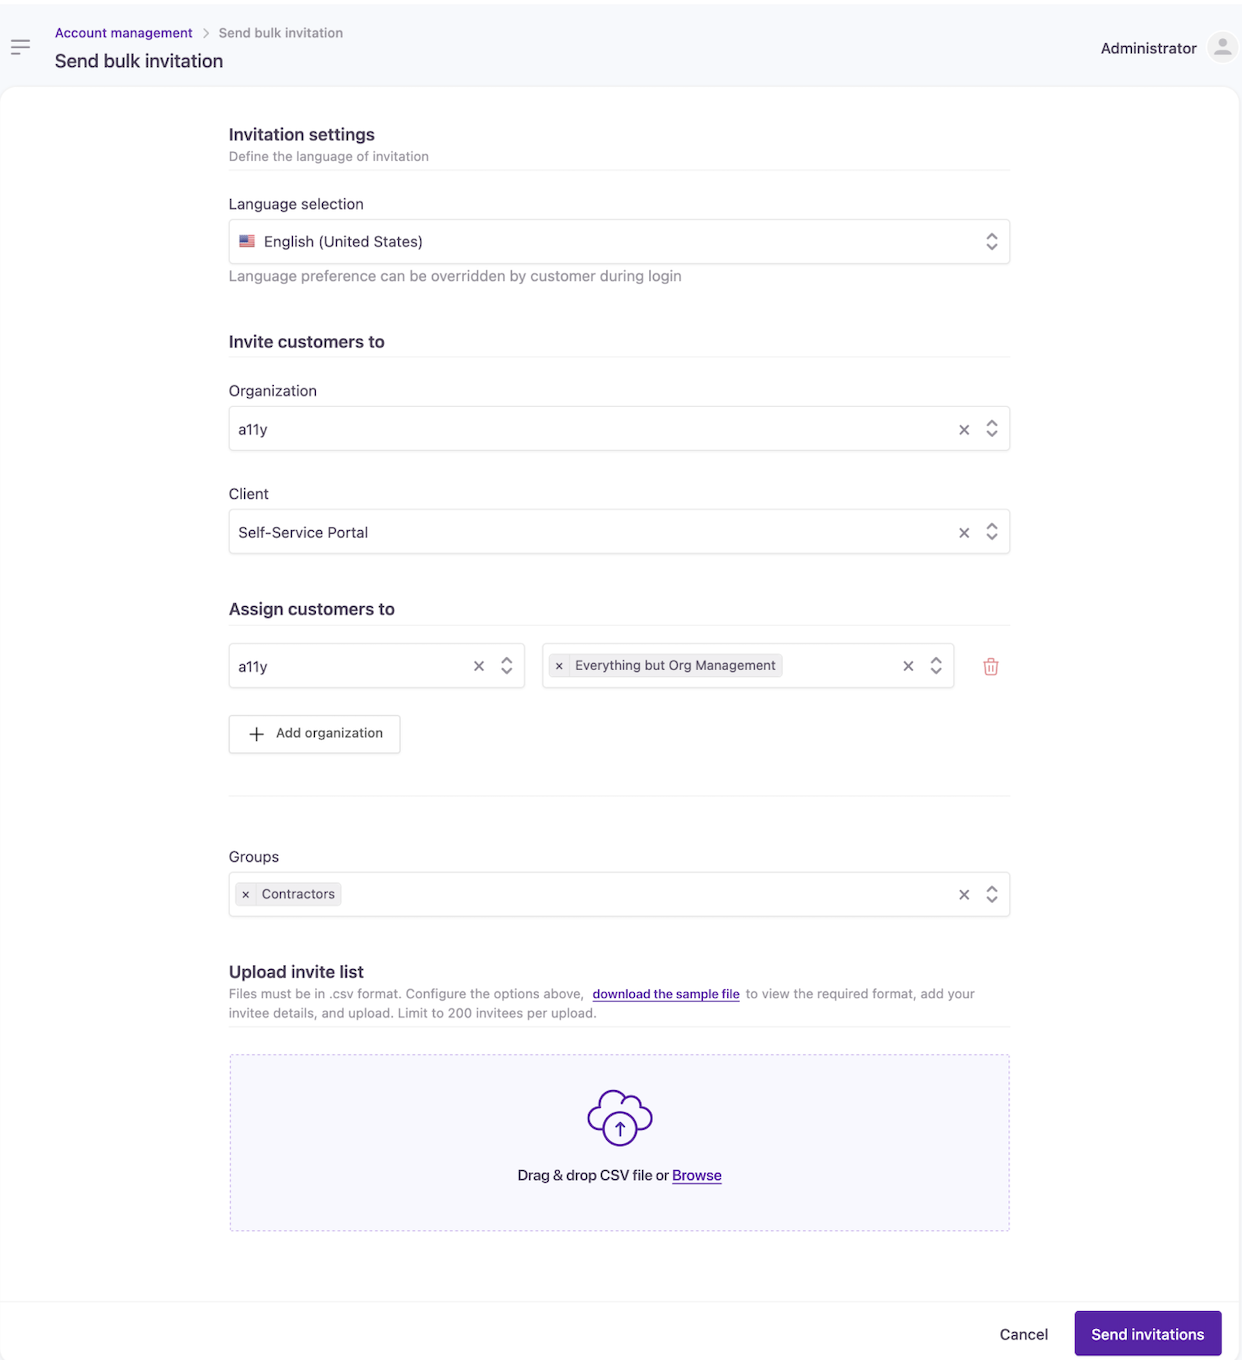
Bulk invite screen
Exporting and importing CSV files
Exporting a CSV file from Excel or Google Sheets
You can export customer data as a CSV file from either Microsoft Excel or Google Sheets. The bulk uploader supports both comma-separated CSV and semi-colon-separated CSV files, so you can upload your file without additional formatting changes.
- Google Sheets: Exports CSV files with commas (
,) as separators by default. No additional steps are needed.
If you need a semicolon-separated file, open the downloaded CSV in a text editor and replace,with;manually, using the Find and Replace all features. - Microsoft Excel: Microsoft Excel uses the List separator defined in your system’s Regional settings to determine how values are separated in a CSV file.
- In North America and some other regions, the default separator is a comma (
,), resulting in a comma-separated CSV. - In many European countries, a comma is used for decimal numbers, so the list separator is typically a semicolon (
;), creating a semicolon-separated CSV.
- In North America and some other regions, the default separator is a comma (
Changing the separator in Excel
If you need to change the separator when saving an Excel file as CSV, follow these steps:
- Open your spreadsheet in Excel.
- Select File > Options > Advanced.
- Under Editing options, uncheck Use system separators.
- Adjust the Decimal separator and Thousands separator based on your desired CSV format:
- For a semicolon (
;) separator:- Set Decimal separator to a comma (
,). - Set Thousands separator to a period (
.).
- Set Decimal separator to a comma (
- For a comma (
,) separator:- Set Decimal separator to a period (
.). - Set Thousands separator to a comma (
,).
- Set Decimal separator to a period (
- For a semicolon (
- Save your file as CSV (.csv).
- If you only need this change for a single file, recheck Use system separators after exporting to restore your default settings.
These changes apply only within Excel. Other applications will continue using the default separator from your system’s Regional settings.
Importing a semi-colon-separated CSV to Excel
Excel does not automatically recognize semi-colon-separated CSV files, so opening the file directly may not display the data correctly.
To ensure Excel correctly interprets the field separator in a CSV file, you can define the separator directly within the file.
There are two possible methods to achieve this:
Specifying the delimiter during import in Excel
Since Excel does not automatically recognize semicolon-separated files as CSV, you must manually specify the delimiter when importing:
- Create a new workbook in Excel.
- Click Data > Get Data > From File > From Text/CSV.
- Select the CSV file you want to import.
- In the Delimiter dropdown, choose Semicolon (
;) or Comma (,), depending on your file format. - Select Load to open the file with the correct structure.
Specifying the delimiter in a text editor
- Open the CSV in a text editor like Notepad.
- Add one of the following lines at the very beginning, before any data:
- For comma-separated values:
sep=, - For semicolon-separated values:
sep=;
- For comma-separated values:
- You can open the CSV file in Excel and the separator you indicated will be applied.
Handling commas in CSV data fields
If your CSV file contains commas within data fields (e.g., "John Doe, Jr.", "New York, NY"), ensure that those fields are enclosed in double quotes to prevent formatting issues.
Example of a correctly formatted CSV file:
"John Doe, Jr.",[email protected],"New York, NY",Admin
"Jane Smith",[email protected],"Los Angeles, CA",User
If your file is formatted correctly but does not upload as expected, check that:
- The correct delimiter is used (either
,or;). - Attribute values containing commas are enclosed in quotes.
Updated 5 months ago