Identity store schema
You can learn about how to set up customer identification and data collection fields for identity stores.
The identity store schema makes setting up new identity stores quick and effortless. Once you’ve configured the key functionalities of the identity store, you’re provided with a set of default attributes that are most commonly used in customer data collection.
Settings
Identity store settings allow you to configure the key aspects of the store, such as setting the supported identifier(s), applying a password policy, and naming the identity store.
Identity store name
The identity store is referenced by this name in the Admin Console.
Description
A description appears under the identity store’s name in the store listing.
Identifiers
Identifiers are unique credentials that identify customers within an identity store. Each identity store must support at least one type of identifier. Strivacity allows you to enable any combination of the following identifiers:
- Username: Customers are asked to provide a unique string that identifies them within the identity store or organization.
- Email address: Customers are required to provide a valid email address that will serve as their unique identifier.
- Phone number: Customers are required to provide a valid phone number, that will serve as their unique identifier.
You can configure the identity store to support any combination of these identifiers, depending on your requirements. For example, if both email and phone number are enabled and made mandatory, customers have to provide both identifiers. If multiple identifiers are optional, at least one must be provided during registration.
Supported identifiers selected at identity store creation are set to mandatory by default, but you can change their required status later on.
Identifier settings
Identifier settings allow you granular control over the required status and visibility of each identifier. You can make one of the identifiers mandatory, the other one optional, you can display or hide one of them from registration, etc.
You can find identifier settings in the Attributes tab for each identifier.
Password quality policy
This policy determines the characteristics of customer passwords and enforces security measures.
You can find out more about password quality settings at the link.
Account event TTL
The account event TTL (time-to-live) period determines how long account events are retained. Strivacity retains account events from the last 30 days by default.
You can contact Strivacity’s customer success team to request a longer retention period.
Enable self-service organization registration
This setting allows administrators with adequate access rights to create organizations via the organization management portal. If it’s disabled, organization admins can’t create new organizations.
Lifecycle event hooks
This option allows for updating external systems if a password change occurs in the Strivacity identity store. You can use an ‘After password change’ event hook that triggers after a password update. Once the hook is created, and tested with your external system, it can be assigned to the identity store.
Attributes tab
Identifiers
The type of required identifier affects some self-service capabilities. You can find out of each identifier type's impact at the link.
You can access username, email, and phone identifier settings by selecting them in the Account attribute list. You can change which identifier is supported, modify their required status, or fine-tune their visibility in customer experiences.
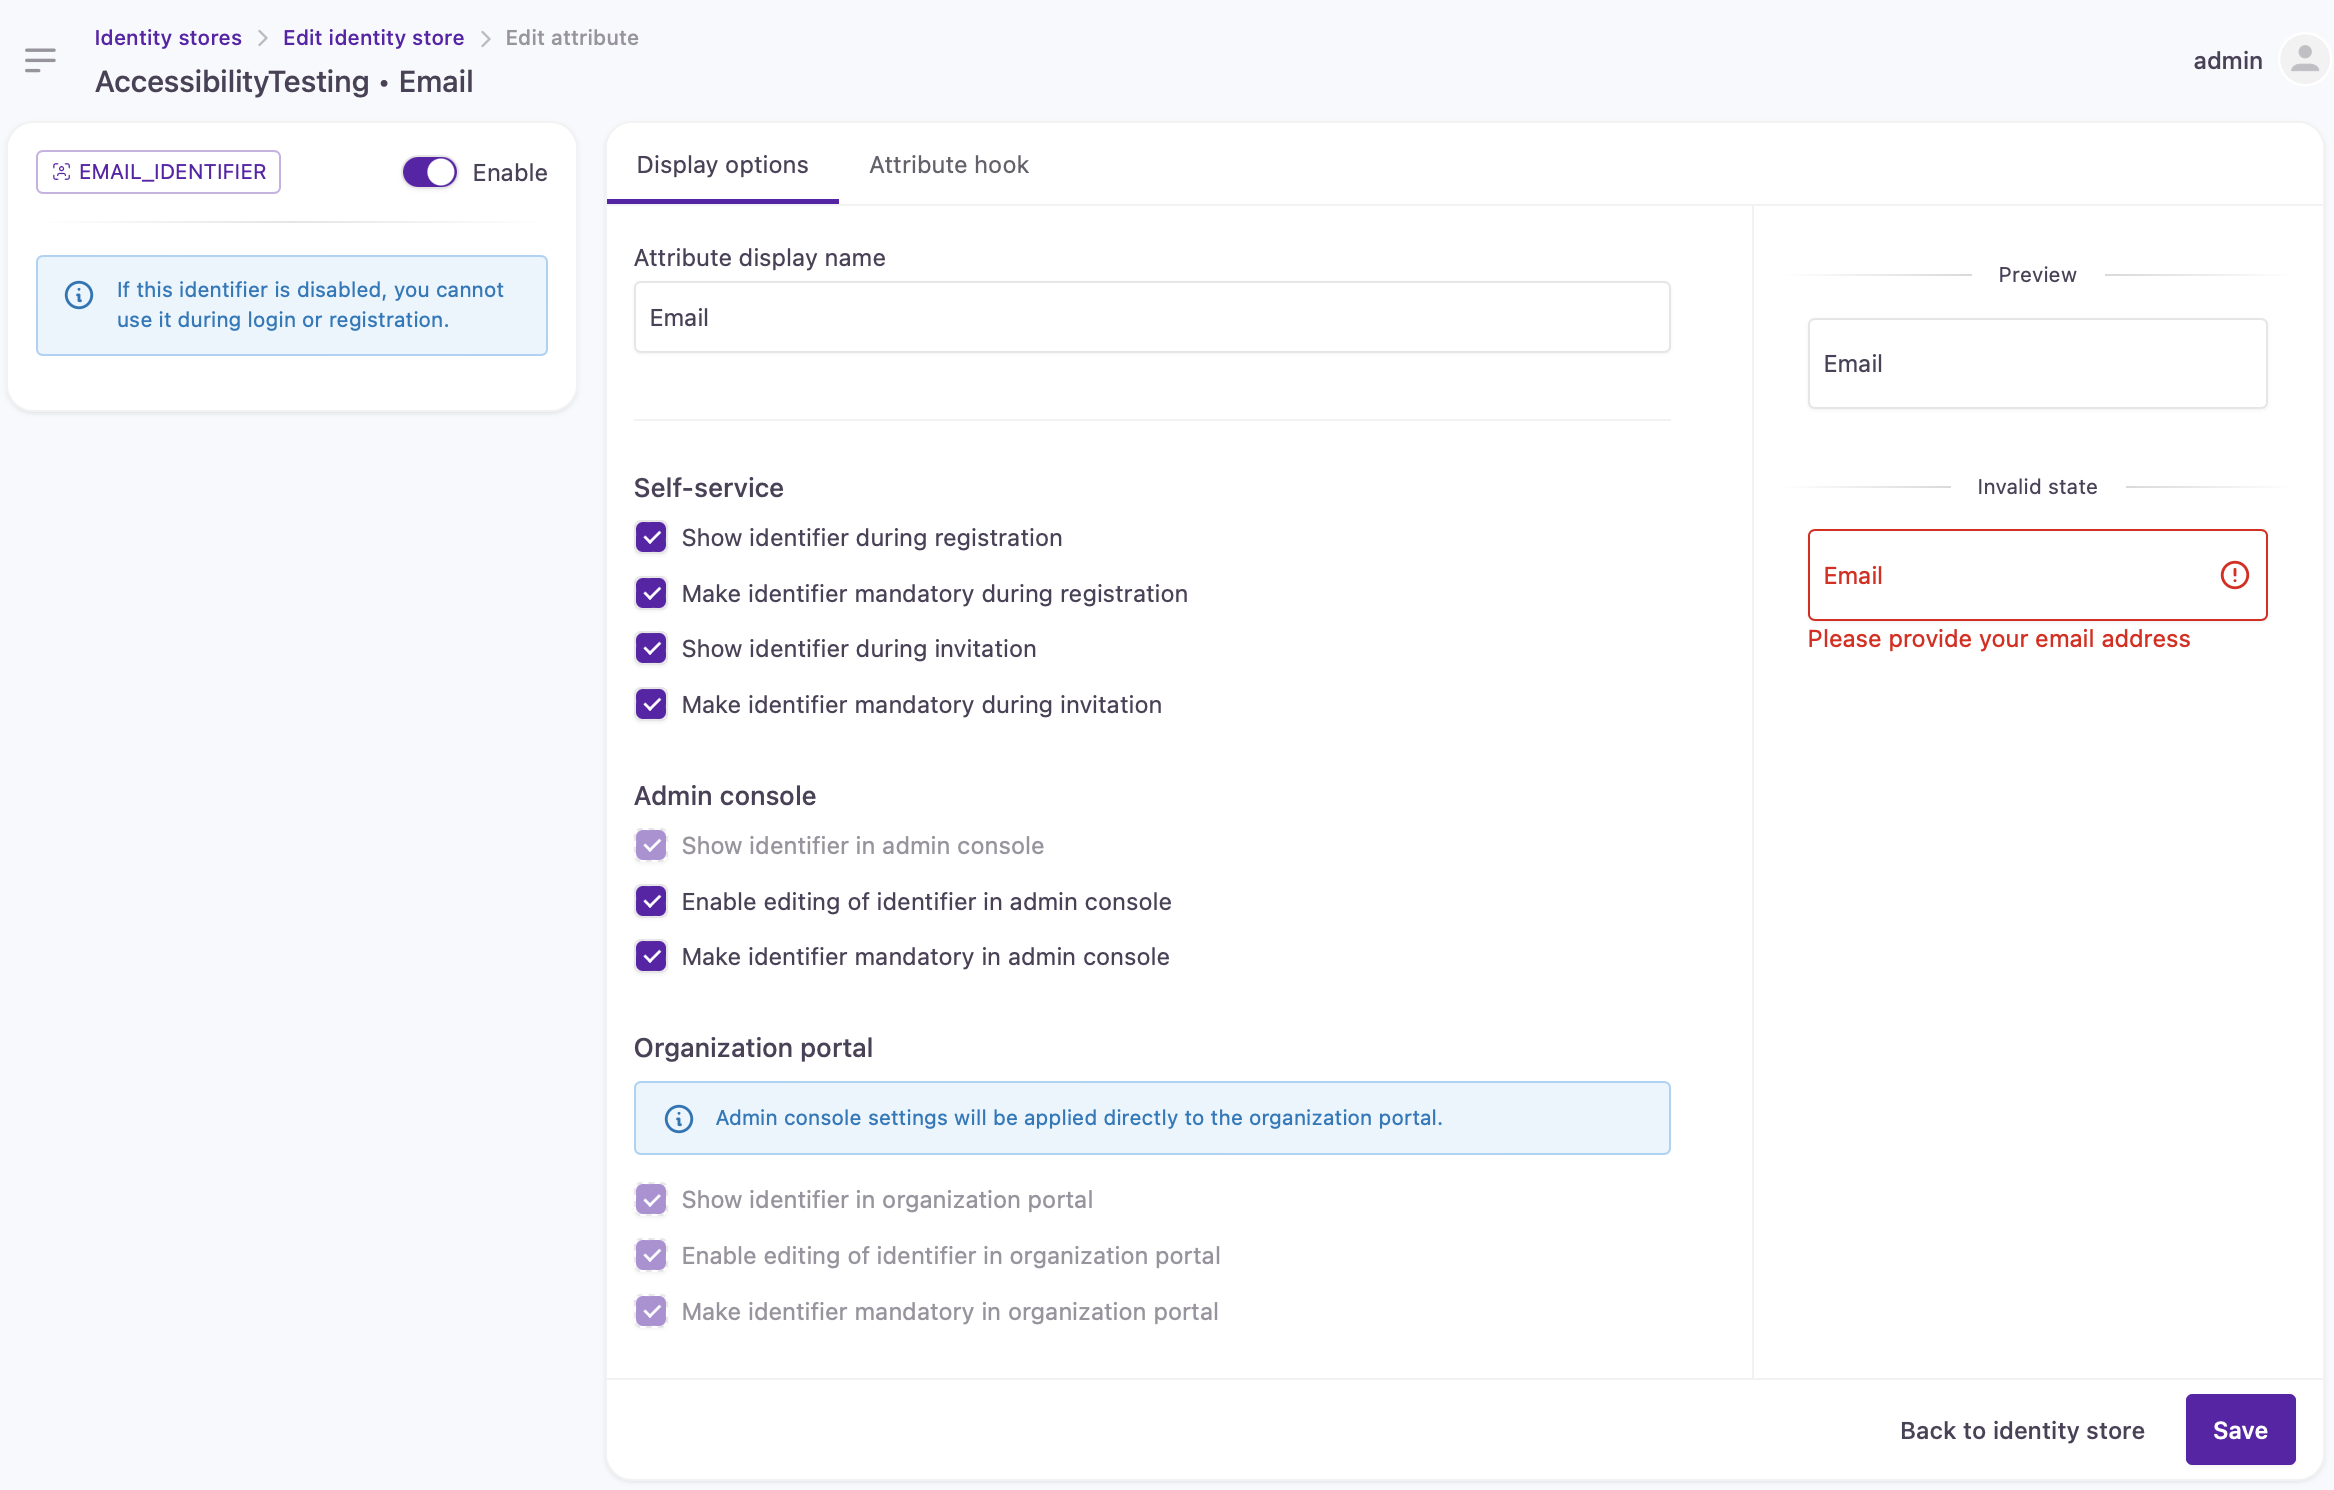
Email identifier settings
Enabled/Disabled switch: This switch determines if an identifier is supported in the identity store. It also controls the visibility of the identifier in customer login experiences.
- When enabled, that identifier type will be available to use during login.
- If disabled, that identifier type will not be shown at login or registration.
This setting does not determine the required status of the identifier. There’s a separete checkbox for that.
Display options
The Display options section allows administrators to configure how identifiers are presented, required, and managed.
Self-service
The self-service options control how identifiers are handled when customers register or are invited to the platform.
- Show identifier during registration: When enabled, the identifier field will be visible to customers during the self-registration process. This lets customers know the type of identifier required to create an account.
- Make identifier mandatory during registration: When this setting is selected, the identifier field becomes a required field during self-registration. Customers will not be able to complete the registration process without providing a valid identifier.
- Show identifier during invitation: If this setting is enabled, customers who are invited will see the identifier field during the invitation acceptance process.
- Make identifier mandatory during invitation: When enabled, customers must enter a valid identifier to proceed with the invitation process.
Admin console
The admin console settings determine how identifiers are managed and displayed by administrators within the platform’s admin interface. These settings apply specifically to administrators and influence the way identifiers can be edited and validated.
- Show identifier in admin console: When enabled, this setting allows administrators to view the identifier field for customers directly within the admin console.
- Enable editing of identifier in admin console: If enabled, this option permits administrators to edit a customer’s identifier within the admin console.
- Make identifier mandatory in admin console: When selected, this setting ensures that the identifier is a required field when administrators are adding customer accounts in the admin console.
Organization portal
These settings dictate how identifiers are displayed and managed within the organization portal, but they are controlled by the admin console settings. This means that any changes made to identifier settings in the admin console will automatically reflect in the organization portal. The organization portal settings themselves are read-only and cannot be modified independently, as indicated by the grayed-out checkboxes.
Use case: Transition from a username-only to email-only support for new customersGranular identifier controls allow you to shift from username-only support to email identifier support without retroactively enforcing email identifiers upon legacy customers. Identifiers no longer have to be mandatory to display their field at login. You can keep the username identifier for legacy customers by
- enabling username as an identifier type so that it is available to use during login,
- not selecting "Make the attribute mandatory" so new customers won't be forced to enter it,
- not selecting "Show attribute during registration"
At the same time, you can set the email identifier as mandatory for new registrations to ensure new customers create email address identifiers.
Username requirements
This section allows administrators to configure specific username requirements for customers.
- The Minimum length and Maximum length fields let you set character length boundaries for usernames, ensuring they fit within your desired range.
- Regular expression: This field enables you to define a specific pattern that usernames must follow, providing flexibility to enforce custom formatting rules, such as requiring certain characters or excluding spaces. Clicking the information icon next to this field reveals details about any default or native username restrictions that may apply, helping administrators understand existing limitations before applying additional constraints.
- Error message: If a customer’s input doesn't meet these requirements, this field lets you specify a custom error message that will be displayed, offering clear guidance on how to adjust the username to comply with your settings. This ensures a customer-friendly experience by directly addressing issues with the input format.
Password attribute
The password attribute allows you to pick the position of the password field on the registration form.
An identifier’s or attribute’s position in the Account attributes list decides the order in which they appear on the registration form. (They need to be made visible at registration to appear.)
You can change the password field’s position by dragging the attribute to a new place in the attribute list. You can place it before or after any identifier or attribute. It will appear in the corresponding order on the registration form.
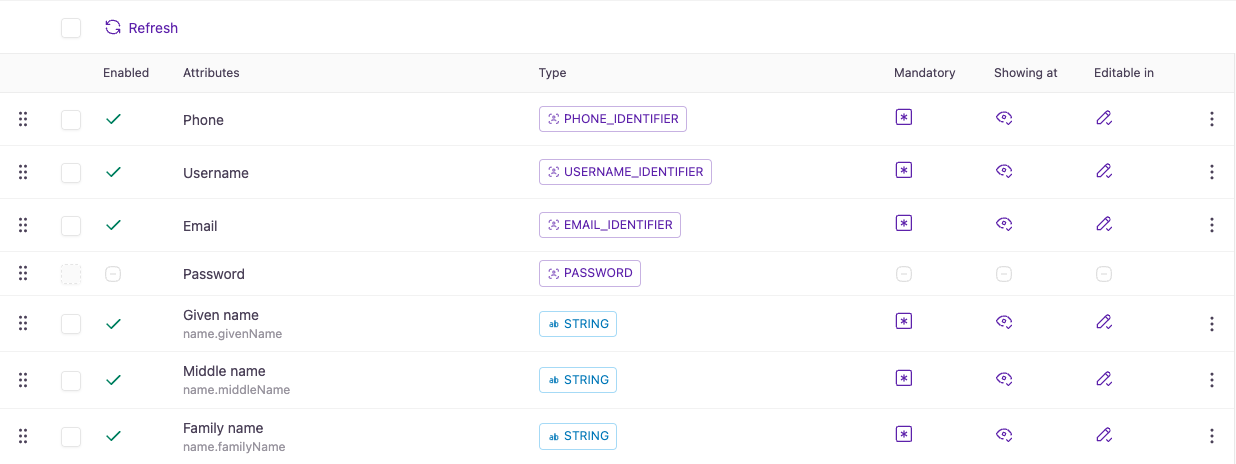
Identifier and attribute placement for registration
Default attributes
Default attributes are set with a governing native claim that corresponds to the type of customer data being collected.
| Name | Type | Default visibility |
|---|---|---|
| Given name | String | Appears at registration by default. |
| Middle name | String | Visible in self-service and administrative experiences except for registration. |
| Family name | String | Appears at registration by default. |
| Nickname | String | Not enabled by default. |
| String | Visible in self-service and administrative experiences except for registration. | |
| Phone number | Phone number | Visible in self-service and administrative experiences except for registration. |
| Street address | String | Visible in self-service and administrative experiences except for registration. |
| City | String | Visible in self-service and administrative experiences except for registration. |
| Region | String | Visible in self-service and administrative experiences except for registration. |
| Postal code | String | Visible in self-service and administrative experiences except for registration. |
| Country | String | Visible in self-service and administrative experiences except for registration. |
| Gender | Select | Not enabled by default. |
| Gender (custom) | String | Not enabled by default. |
| Picture | String | Visible in self-service and administrative experiences except for registration. |
| Department | String | Not enabled by default. |
| Company | String | Not enabled by default. |
| Job title | String | Not enabled by default. |
Adaptability
Attributes (not just the default ones) are highly adaptable, meaning they can be used in various ways in the customer journey. You can decide which attribute to include
- at registration,
- in customers' self-service portals,
- in account management for Admins,
- in progressive profiling steps using Lifecycle Event Hooks.
You can also change the behavior of each attribute field by applying JavaScript attribute hooks.
Attribute hook
Attribute hooks are designed to dynamically control the behavior of form fields based on customer interactions, allowing real-time adjustments as customers complete the form. Available for every attribute, these JavaScript-based hooks enable you to tailor the experience by showing, hiding, disabling, or requiring fields based on known preferences or selections the customer has made so far, making the form more responsive and relevant to each individual customer.
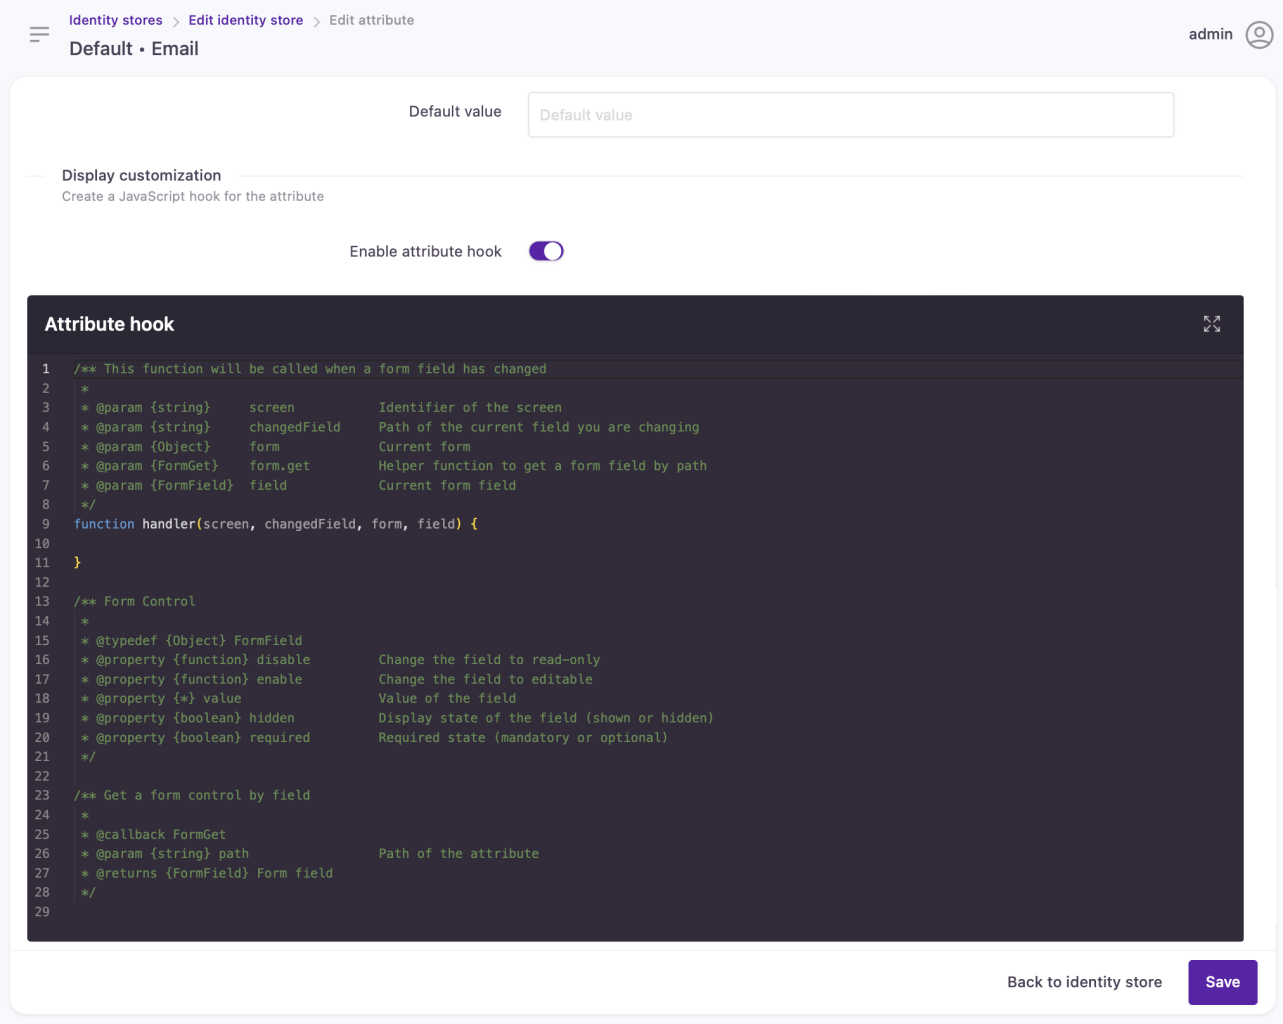
Attribute hook configuration panel
Custom attributes
You can use the default setup or customize and scale identity stores to your use cases. You can add custom attributes of 5 different types, override governing native claims, and further extend attribute capabilities:
- Custom attributes can be used in third-party data synchronization.
- You have flexibility in adjusting the attribute’s functionality to your needs with the help of Lifecycle Event Hooks.
- New fields can also be configured for search indexing.
Editing the identity store schema can have adverse effects on your customer experience. By design, new attributes cannot be deleted (they can be disabled and hidden). While this helps avoid accidental data destruction we advise caution when managing account attributes.
For more information on how to configure and extend the list of available attributes and to learn about the various attribute types, go to the following pages:
Updated 3 months ago