Organization portal
The Organization portal allows B2B customer admins to manage their organization’s customer accounts through a dedicated portal. This reduces the support burden on your brand by allowing B2B customers to handle their own account management.
Organization portal
Each organization-enabled application includes a dedicated account management portal for organizations. Organization admins can log in to this Organization portal to manage accounts for their assigned organization.
You also have the option to integrate with our APIs if you prefer to do organization management through a homegrown client.
Capabilities
The portal provides a focused interface for organization admins. Within this interface, they can:
- View and search for customer accounts in their organization.
- Perform identity and authenticator management tasks.
- Manage core account details such as names and identifiers.
- Support customers directly by verifying identifiers or disabling accounts when needed.
- Manage specific customer bases.
The Organization portal includes the same account management capabilities as brand admins have at their disposal in the Admin Console.
Organization admins can find accounts in a single search across all organizations in a hierarchy where identifier uniqueness is supported.
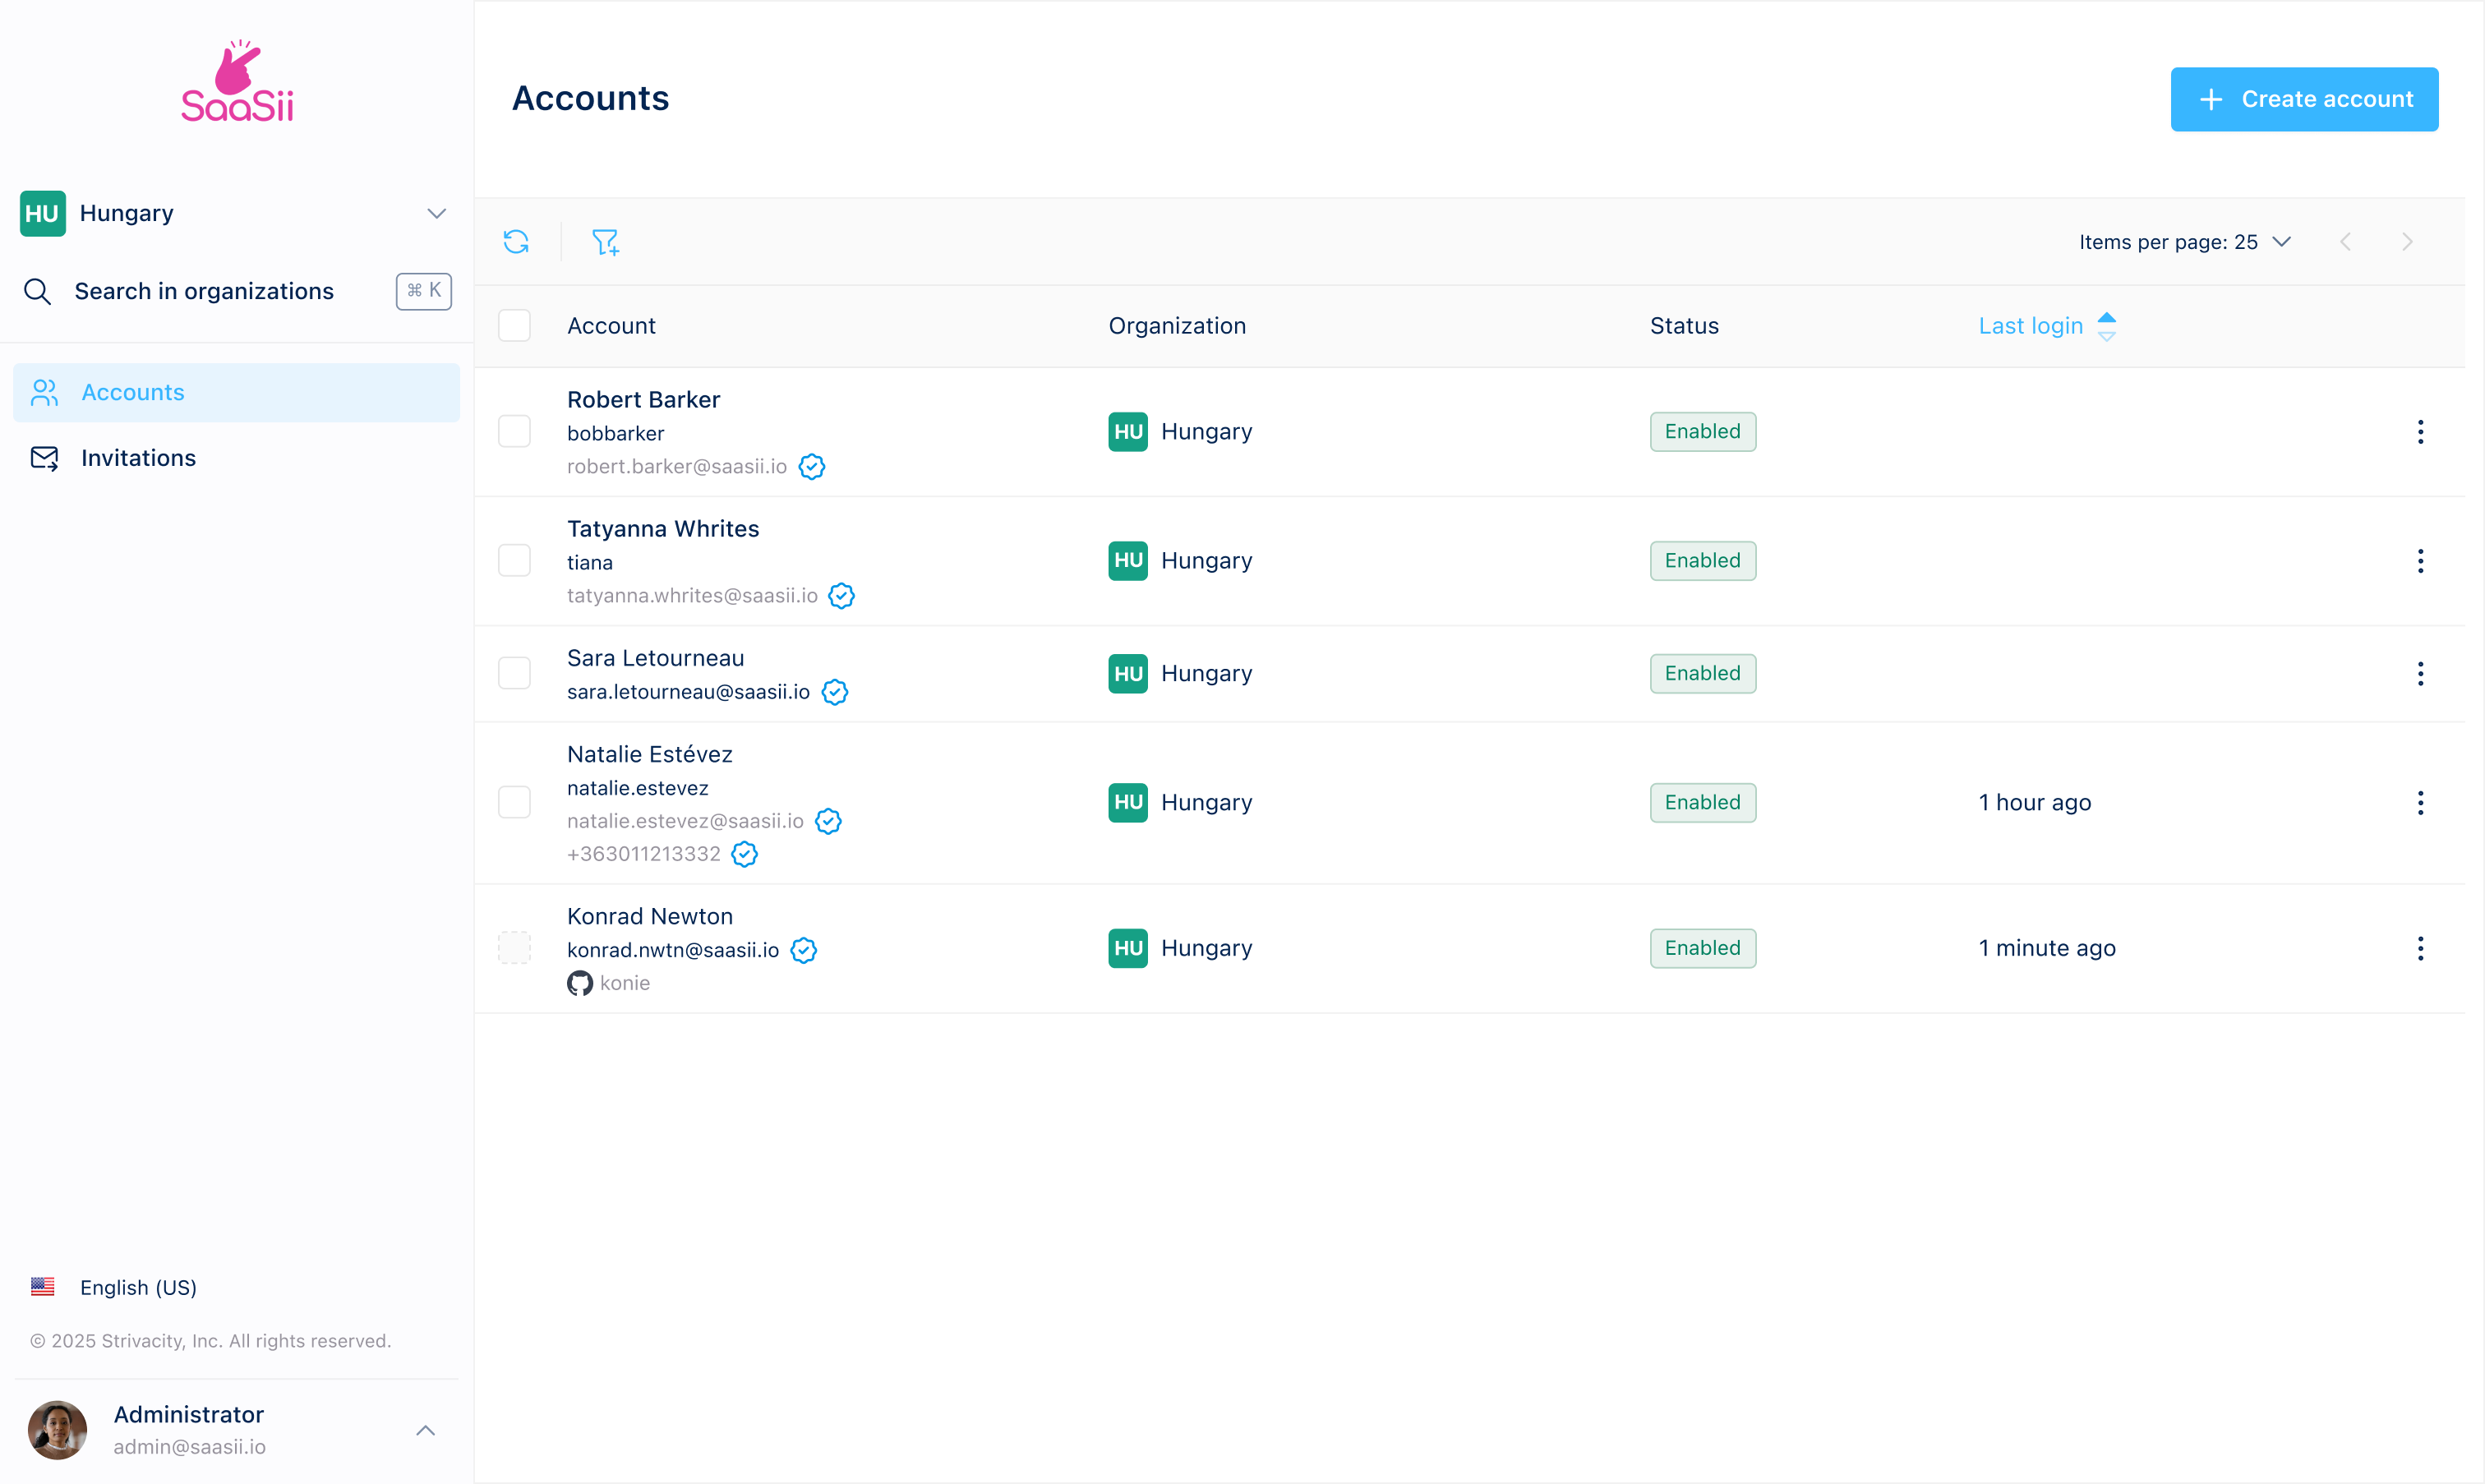
Organization portal interface
Organization admins access a dedicated interface that includes account and invitation management tools, navigation elements, and controls for performing common administrative actions.
Navigation panel (left sidebar)
The navigation panel on the left provides access to key areas of the Organization portal and displays contextual information about the admin and organization.
- Organization selector (top left): Displays the current organization the admin is managing. If the admin has access to multiple organizations, this selector lets them switch between them. Admins can use the star icon to pin organizations and the adjacent arrow to access favorites quickly.
- Search in organizations: A keyboard-enabled search field (⌘K) to quickly find organizations based on name or full route.
- Accounts: The default tab, displaying a list of all customer accounts in the selected organization.
- Invitations: A tab where the admin can view and manage sent or pending invitations for new accounts.
- Language selector: Allows the organization admin to change the display language of the portal.
- Admin profile preview: Shows the name and primary identifier of the currently logged-in admin. The arrow expands a menu with theme options (light, dark, or system) and a logout option.
Accounts tab
This tab allows admins to view and manage existing customer accounts.
Toolbar (above the account table)
- Title ("Accounts"): Indicates the current view or section.
- Create account button: Lets the organization admin create a new customer account.
- Refresh data button: Fetches the latest list of accounts from the identity store.
- Filter button: Allows narrowing down the results based on status, identifiers (login identifier, account ID, username), memberships (group, role), dates (last login, created, updated, disabled), or attributes (email, given name, family name, birthdate).
- Items per page dropdown: Controls how many items appear in the list view.
- Pagination arrows: Navigate between pages of the account list.
Account table columns
- Account: Lists the customer’s display name and associated identifiers (username, email, phone). Also shows identifier verification status and any connected social or enterprise accounts, including the external identifier used by each provider.
- Organization: Displays the organization the account belongs to. This is useful if the admin manages multiple orgs.
- Status: Shows whether the account is Enabled or Disabled.
- Last login: Indicates the time since the customer last successfully logged in.
- Actions (︙): Opens the account actions menu, which includes options to edit account details, copy the account ID, change the account password, and clear account sessions.
Account details page
Selecting an account from the list opens the Account details page, where organization admins can view and manage detailed information about the selected customer, including personal data, activity history, authentication methods, recognized devices, and consent records.
Overview tab
Displays the customer’s main account information and personal details. Organization admins can review identifiers, recent activity, and profile data, or take direct account management actions.
- Account summary panel (left): Shows the customer's display name, username, verified identifiers (such as email and phone number), organization details, and linked external identities. Organization admins can edit the username and identifiers, unlink external identities, and review metadata, including the number of logins, last IP address, and timestamps for the last login, update, and account creation. The Recent activity section provides a snapshot of recent account events such as logins, logouts, and token requests.
- Personal information panel (right): Contains editable fields for personal details like name, contact information, and address (street, city, region, postal code, and country). Organization admins can also update the customer’s profile picture. Changes are saved using the Update button.
- Account actions (top right): Includes quick management controls such as Disable account and Password reset, allowing admins to manage access directly from the Overview tab.
Activity tab
Provides a chronological list of account-related events for the selected customer. Organization admins can use this view to monitor login activity, customer flow events, and administrative actions associated with the account.
- Refresh button: Reloads the activity list to display the most up-to-date event history.
- Filtering: Allows admins to narrow the list of events by date or account event label.
- Event table: Displays a timeline of all recorded activities, including customer flow events (such as logins, token requests, or logouts) and administrative actions (for example, password resets or account updates).
- Date: The timestamp of when each event occurred.
- Event type: The category of the flow, such as Customer flow, Self-service, Administrative, Scheduled, or Bulk operation.
- Result: Shows the outcome of each event, including success or failure indicators.
The Activity tab displays only high-level customer-related account events. Detailed diagnostic data (such as event actor, internal metadata, admin IP addresses, or flow-level internal processes) is intentionally excluded for privacy and security reasons. Organization admins see only the same categories of events that are available to end users through the Download my data export.
Notifications tab
Lists all system-generated notifications that were sent to the customer, such as password reset emails or MFA enrollment messages. Organization admins can use this view to confirm what communication was delivered, when it was sent, and where it was sent.
The tab includes:
- Refresh button: Reloads the notification history to display the most recent events.
- Notification table:
- Date: Shows when the notification was sent, including timestamp and date.
- Notification template: The name of the notification template used. This reflects the template configured in your brand’s notification policies.
- Target: Displays the destination the notification was sent to (typically the customer’s email address or phone number). The channel type (for example, email) is also listed.
- Expiration time: For notifications that include time-bound challenges (such as passcodes or reset links), this column shows when the link or code expires.
Groups tab
Lists all the groups that the selected account belongs to within the organization.
The tab includes:
- Group table: Displays the names of all groups the account is currently a member of.
- Refresh button: Updates the list to reflect the most recent group memberships.
- Actions (︙): Opens a menu with available options for managing group membership.
Roles tab
Lists all organization roles assigned to the selected account. Roles define what administrative actions an organization admin can perform in the Organization portal, for example, managing accounts, resetting authenticators, or verifying customer identities.
The tab includes:
- Refresh button: Updates the list to reflect the most current role assignments.
- Role table: Displays every role granted to the account, along with the organization where the role applies.
- Organization: The organization in which the role is active.
- Role: The specific organization role assigned to the account (for example, Admin, Organization manager, Account recovery assistant).
- Actions (︙): Opens a menu with available options for managing the role assignment.
Authenticators tab
Lists the authentication methods registered to the selected customer account. Organization admins can use this view to review which authenticators the customer has set up and remove them when necessary.
The tab includes:
- Add authenticator: Allows the organization admin to register a new authenticator on behalf of the customer.
- Delete authenticator (︙): Removes the selected authenticator from the account. This prevents the customer from using it for future sign-ins or verification actions.
- Refresh button: Reloads the list of authenticators to ensure the latest data is displayed.
- Authenticator table:
- Authenticator: The identifier associated with the authentication method.
- Type: The authentication method type the customer has registered.
- Added: The date and time when the authenticator was enrolled.
- Last used: The date and time the authenticator was last used in an authentication flow.
Sessions tab
Shows all active sessions for the selected customer account. Organization admins can use this view to monitor where and when the customer is currently signed in, and to revoke those sessions if needed for security or troubleshooting purposes.
The tab includes:
- Refresh button: Reloads the session list to ensure the most current session information is displayed.
- Clear sessions: Signs the customer out of all active sessions.
Clearing sessions does not disable the account or delete any credentials. It only terminates active authenticated sessions.
- Session table:
- Device: The browser and operating system used for the session.
- Location: The IP address and the geolocated city/country associated with the most recent activity in the session.
- Date: The timestamp of the last activity recorded for that session.
Identity verification tab
Allows organization admins to review and manage any identity verification checks associated with the selected customer account. This tab displays verification data generated through configured identity verification policies.
The tab includes:
- Refresh button: Reloads the latest identity verification data for the account.
- Manually verify: Opens a dialog where the admin can manually complete an identity verification step for the user. The admin must select a verification policy, based on the organization’s configured options, and confirm the action to mark the account as verified according to that policy.
- Verification table: Lists each verification policy applied to the account, along with:
- Verification policy: Name of the policy.
- Attempts: Number of verification attempts made under that policy.
- Successfully verified: Whether the verification was completed successfully.
- Result revoked: Whether a previously successful verification result was revoked.
If the user has not gone through any verification process yet, the tab displays “No identity verification data available.”
Consents tab
Displays all consent records that the customer has granted or revoked, based on the consent policies configured for the organization. This allows organization admins to review the customer’s current consent state as well as historical consent timestamps.
The tab includes:
- Refresh button: Reloads the latest consent information.
- Consent table: Each row shows a consent associated with the customer, including:
- Name: The consent name, along with its version.
- Granted: The date and time when the customer last granted the consent.
- Revoked: The date and time when the customer revoked the consent (if applicable).
If a consent has been granted but never revoked, the Revoked column remains blank.
Invitations tab
This tab provides visibility into customer invitations sent from the selected organization.
- Toolbar (above the invitation table):
- Title ("Invitations"): Indicates the current view or section.
- Invite customer button: Opens the invitation form to send a new customer invite. The arrow next to the button opens up the option to bulk invite customers.
Invitations in the Organization Portal follow the same behavior and configuration options as described in the Customer invitation and Bulk customer invitation documentations.
However, duplicate invitation checks are currently only supported for single invitations in the Organization Portal, not bulk invitations.
- Refresh data button: Fetches the latest list of invitations.
- Filter button: Allows narrowing down the results based on email and status.
- Items per page dropdown: Controls how many items appear in the list view.
- Pagination arrows: Navigate between pages of the account list.
- Invitation table:
- Email address: The email the invitation was sent to.
- Client: The application client that the invited customer will use to complete registration (typically "Organization Portal").
- Status: Indicates whether the invitation is still valid ("Done") or expired ("Outdated").
- Last sent: Shows when the invitation was most recently sent or resent.
- Actions (︙): Opens the actions menu, which includes options to view, resend, or delete the invitation.
When you apply filters, the URL automatically updates to reflect your filter selection. This allows you to share or bookmark your current view. Your last-used filters are remembered: if you navigate away and return, the same filters will be applied.
Role-based access management
Organization admin capabilities are defined by organization roles. Each role controls what a delegated admin can do within the portal, such as creating new accounts, verifying identities, or resetting authenticators.
Thanks to cross-organization grants, a single organization admin can hold roles in multiple organizations, even if their own account is only tied to one.
To be assigned an organization role, an admin account must exist in the same identity store as the customers and organizations they need access to.
Organization portal branding
By default, the branding policy applied to an application is automatically inherited by any organizations created within it. This means that the login and account management experiences in the Organization portal will follow the design settings configured in the associated branding policy.
However, you can override the default branding at the organization level without creating a new branding policy. To do this, go to:
Admin Console > Organizations > Select an organization > General tab > Branding section.
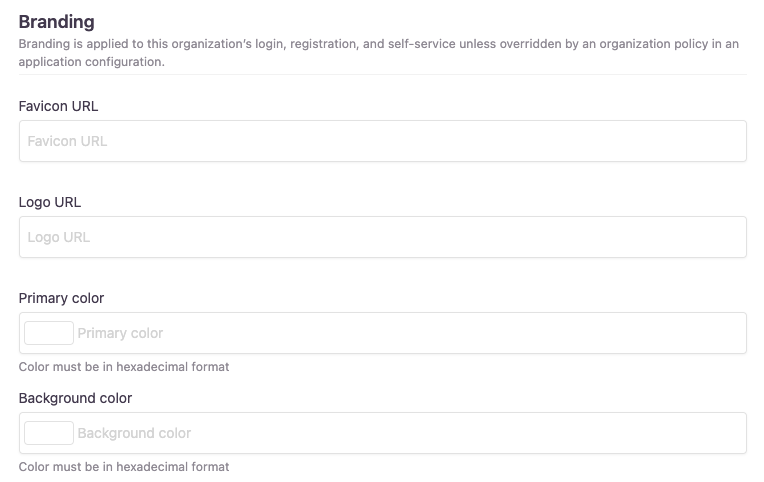
Options to customize an organization's branding
Here, you can adjust elements such as the logo, background color, and header styles specifically for that organization. These settings take precedence over the base branding policy but are limited to predefined customization options.
For more extensive customization, such as modifying layouts, adding custom CSS, or injecting scripts, use the Branding policy editor under Policies > Branding in the left-hand menu on the dashboard and select the policy you want to edit. In the editor, select Organization portal from the Custom CSS or Additional script menus to apply advanced styling changes.
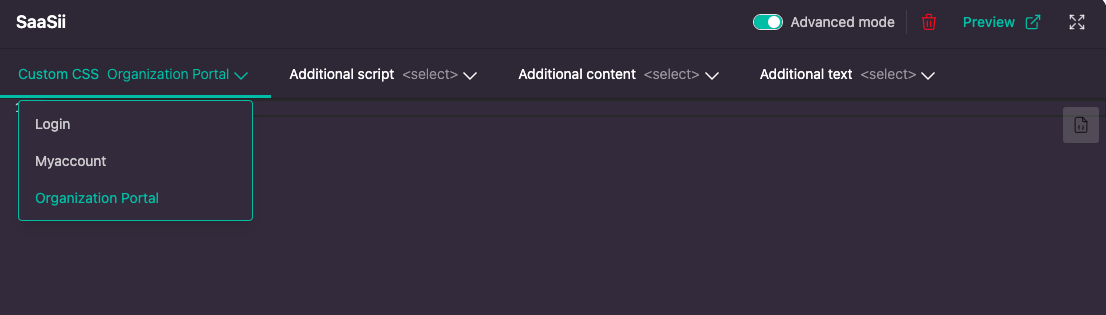
Selecting Organization portal branding within the Branding policy editor
Updated 4 days ago