Registration journey
The registration journey in Strivacity guides customers through the steps required to create and activate an account. This process includes several steps designed to collect and verify the necessary information while ensuring a secure and user-friendly experience.
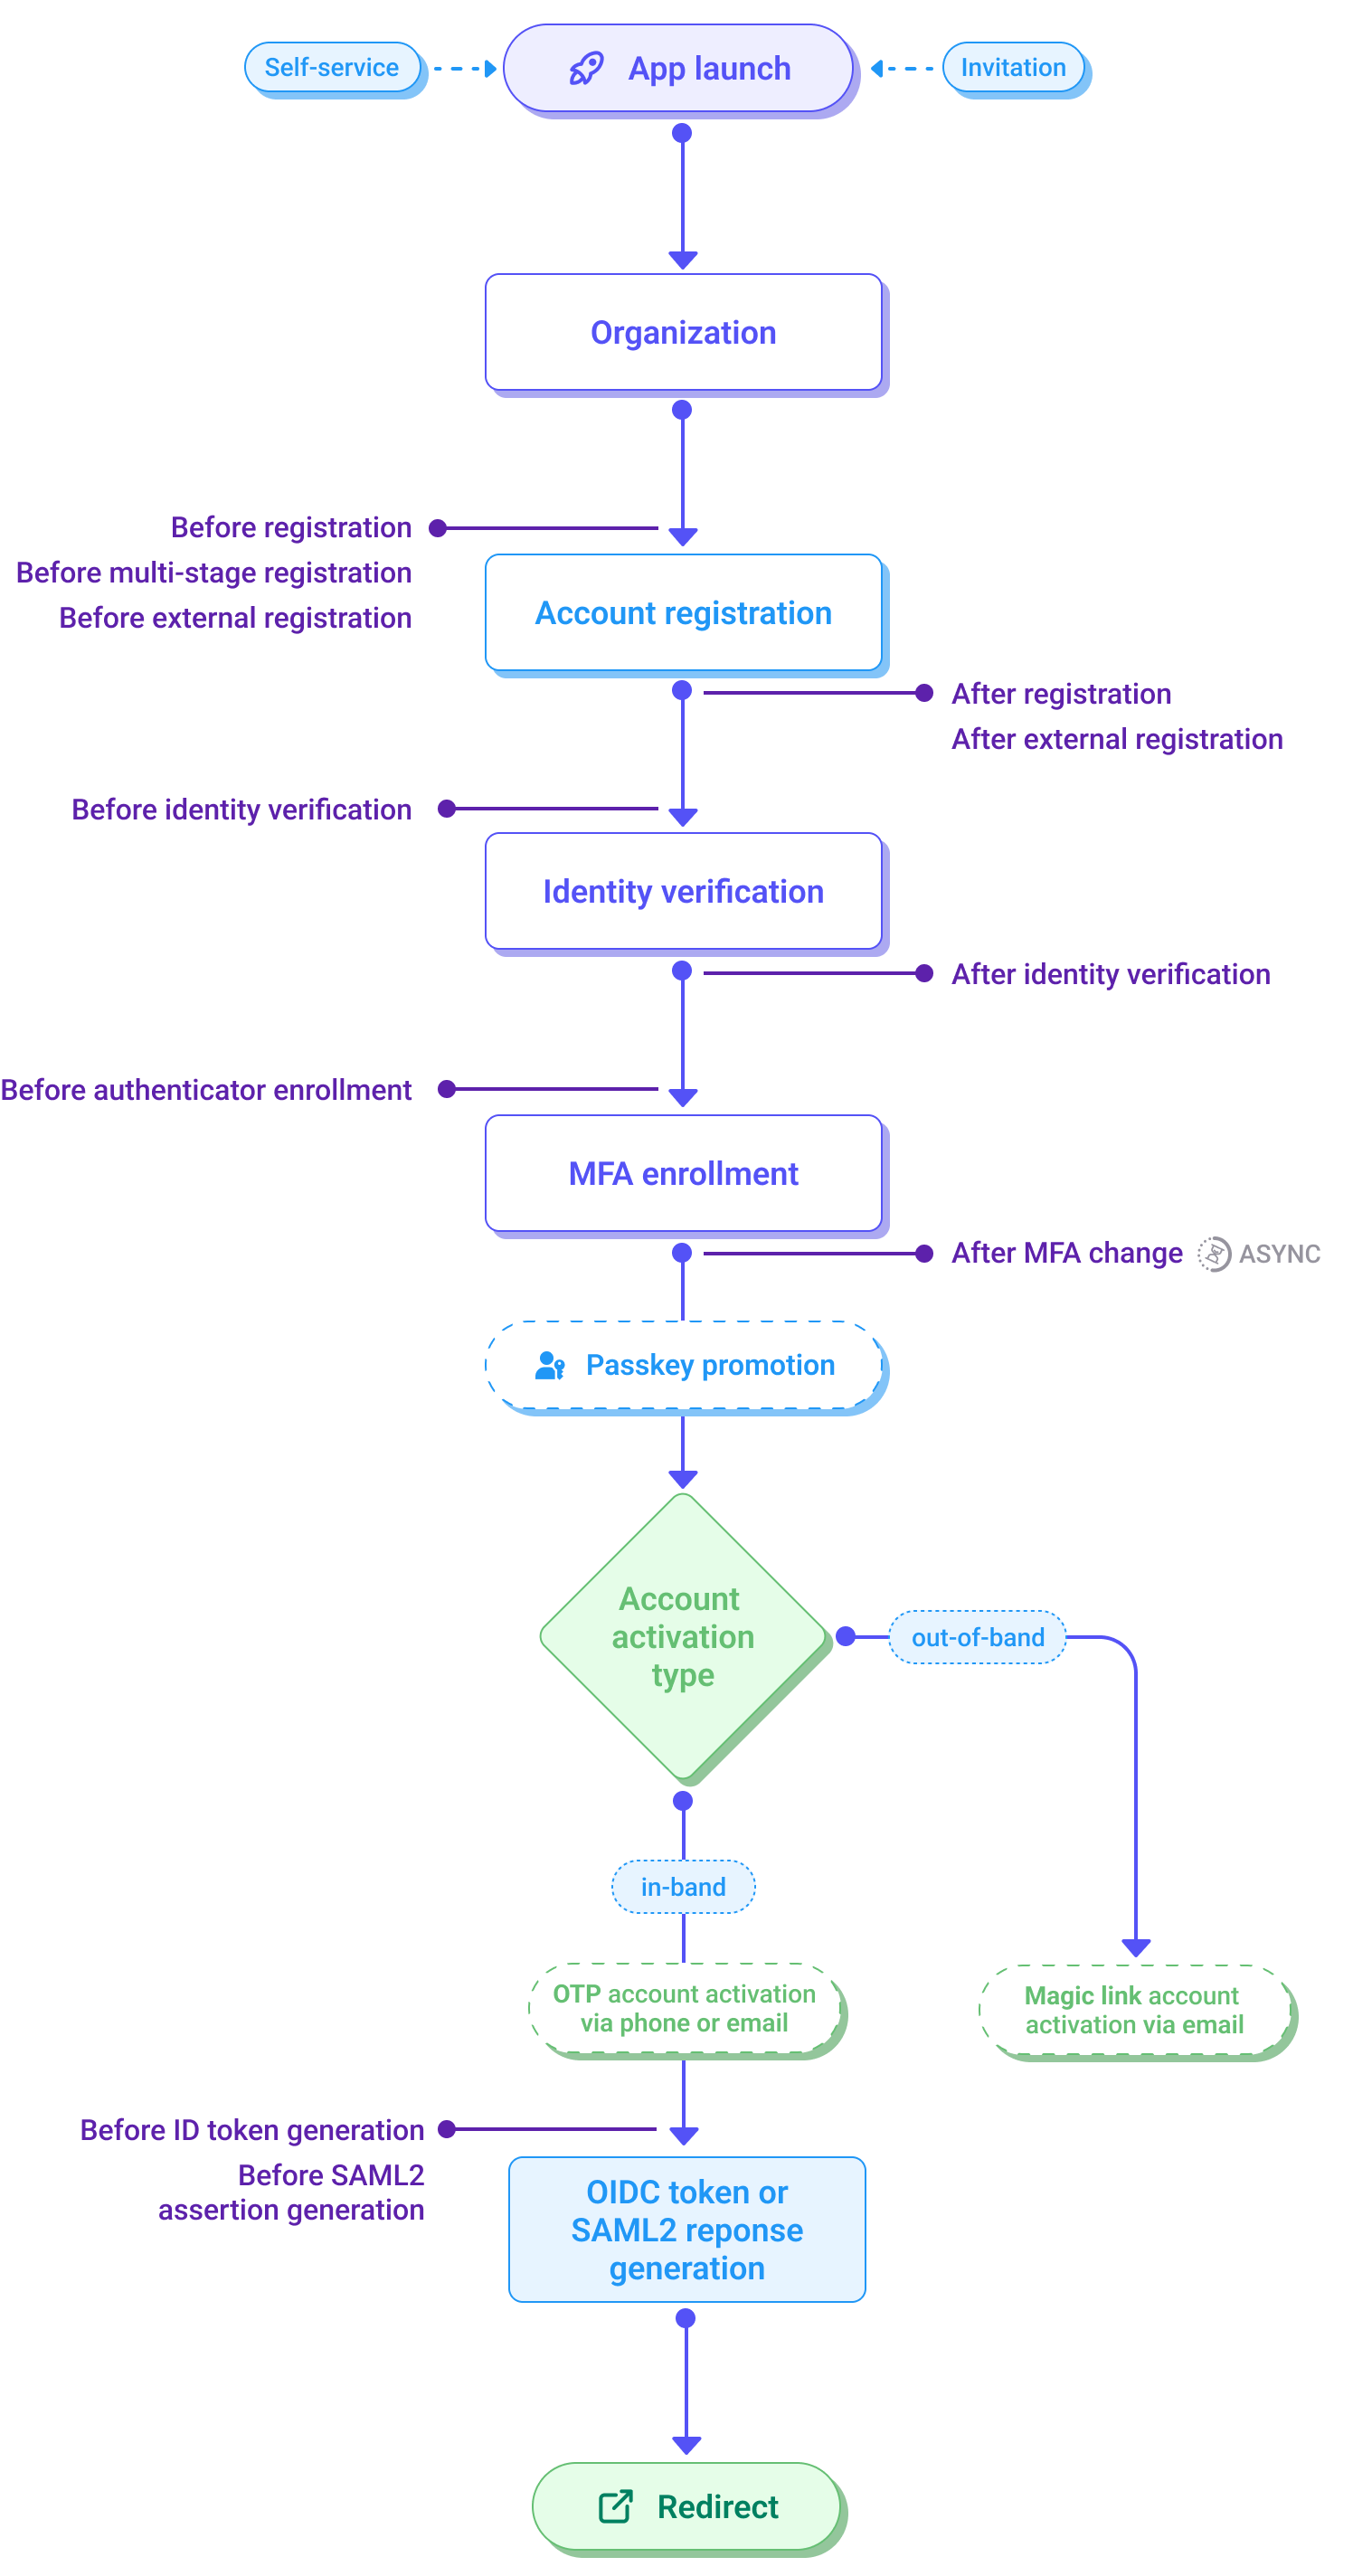
- App launch: The registration process begins when a customer launches the application, either through self-service or by accepting an invitation.
- Organization: This step involves identifying the organization the customer is associated with in B2B use cases, which includes selecting an organization or automatically identifying it based on certain criteria.
- Account registration: The customer completes the registration form by creating an identifier and password, providing the required and optional attributes configured in the application's identity store, and accepting consents.
- Identifier: The customer creates a unique identifier to represent their account.
- Password: The customer creates and confirms a password for the account.
- Account attributes: The customer enters the required and optional attributes that will be stored in their account record.
- Consents: Any mandatory or optional consents will be presented and collected here.
- Identity verification: After registration, customers may be required to undergo identity verification to ensure that their identity matches the information provided. This workflow is defined by the identity verification policy.
- MFA enrollment: MFA enrollment is prompted, enabling an additional layer of security by linking an additional authentication method to the customer’s account.
- Account activation: Following MFA enrollment, the account activation step (if configured) finalizes the registration process by verifying an email or phone identifier before allowing a customer to log in. Account activation marks the transition from registration to an active, usable account state. There are two options available in the self-service registration settings: in-band activation (OTP via phone or email) and out-of-band activation (magic link via email).
- OIDC token or SAML2 response generation: Upon successful registration and activation, an OIDC token or a SAML2 response is generated to facilitate secure authentication.
- Redirect: Finally, the customer is redirected to the appropriate destination based on the organization’s configuration, completing the registration journey.
Extensibility points
Strivacity's customer journeys have various points where custom Journey Builder workflows and Lifecycle Event Hooks can be inserted to extend the natively configured workflows. These extensibility points are triggered by various events that happen during the customer journey.
There are two types of hooks: synchronous, which pauses Strivacity’s workflow until the script completes execution, and asynchronous, which runs the script without interrupting the workflow.
In the registration journey, the following extensibility points are available:
After customer identification: This event is triggered once the customer has provided their identifier (email address, username, or phone) and before they are asked for any factor of authentication. This hook can be used to step up or step down the login flow based on an external event, risk data from an external system, or other customer account attribute information. Synchronous hook.
After external login: This hook can trigger an event or retrieve data from an external system after a customer registers or logs in with a social login provider, potentially affecting the flow. Synchronous hook.
Before registration: This hook can be used to modify the collected data, add extra attributes, discard data, change the customer's organization, or add phone or email MFA methods by fetching data from an external system so they can be used in the customer's account during the registration process. Synchronous hook.
Before multi-stage registration: This hook allows you to break down the registration form into smaller chunks and present the parts in a multi-step manner. In the hook, you can include attributes that are displayed at registration, consents assigned to the application in use, identifiers supported by the identity store, password, or static content. It can be decided on a screen-by-screen basis where the external login providers will be displayed. A summary screen at the end of the registration flow will automatically display all the information that wasn't used in this hook but is part of the flow. The hook can be configured to skip the summary screen if only optional fields or consents remain at the end. Synchronous hook.
Before external registration: This hook allows control over what happens after a new account is authenticated through an external provider. It allows you to suppress and silently accept confirmation screens and it also provides ways to link to other, already existing accounts in addition to what the default linking target would be. Synchronous hook.
After registration: This hook initiates once the customer completes account registration, launching an external event, or fetching/updating data with an external system, affecting the flow if needed. Synchronous hook.
Before identity verification: This event launches prior to starting the identity verification workflow, allowing data retrieval from an external system for verification purposes without storing the data in the customer’s account. Synchronous hook.
After identity verification: This event launches after the identity verification workflow has finished. It can be used to persist the information gathered during the identity verification process to the customer's account. Synchronous hook.
Before authenticator enrollment: This hook allows you to customize the MFA enrollment workflow based on customer behavior or information collected from external systems such as CRMs, marketing hubs, or data analytics platforms. Additionally, it can override the MFA enrollment plan defined in the adaptive access policy for the application. You can control the appearance of enabled authenticators, such as email, phone, platform biometrics, etc. However, the methods associated with those authenticators (e.g., magic link, passcode) cannot be configured through the event hook. This hook also lets you enforce a specific email or phone number authenticator, even when restrictions apply. You can require customers to enroll in one of the enabled authenticators if every method is set to optional in the basic MFA flow, or prompt them to change their password. Synchronous hook.
After MFA change: This hook can trigger an external event or fetch data from an external system once the customer has completed the verification of a new/additional MFA factor during enrollment or removed a factor. Asynchronous hook.
Before ID token generation: This event activates before the ID token is created. It allows you to inject custom claims or data from an external system into the ID or access token, add new scopes, or remove scopes from the access token. Synchronous hook.
Before SAML2 assertion generation: This event activates before generating a SAML2 assertion, allowing custom attributes to be added to a SAML2 response by pulling data from an external system. Synchronous hook.
Updated 5 months ago