Create an identity verification policy
Creating an identity verification policy lets you define how customers prove their identity during account registration. You can combine multiple verification methods (such as phone-based checks, document verification, or fraud detection) into a single policy that follows your desired flow and logic. Once created, this policy can be linked to your authentication journeys to ensure consistent, secure identity verification experiences.
Configuration
- Navigate to Policies and Identity verification in the Admin Console.
- Select Create identity verification policy.
- First, add a name to your policy.
- Then, select a consent from your global Consents list to collect from your customers during identity verification. You can change the consent at the Verification notification configuration later on.
- Choose Create to continue.
Verification steps
Configure the steps that customers will complete to verify their identity.
Select the + icon to add a new verification step to your policy. Once the step is added, select the pencil icon in its row to open and configure its settings. You can find detailed setup instructions for each verification step by following the links in the list below.
The Verification notification and Failure message blocks are added to the workflow by default.
-
Verification notification: A step to collect customer consent and inform customers about the identity verification process they're about to enter.
-
Phone fraud: risk evaluation: A step where you can decide which phone signal to consider as high risk.
-
Phone fraud: attribute matching: A step that verifies customer identity by matching the provided personal data against phone carrier records.
-
Knowledge-based verification: Add a questionnaire to the identity verification flow containing details only the customer should know.
-
Identity fraud detection: A step that evaluates customer-provided information (such as email or address) for fraud risk using external data sources. This helps identify and block potentially fraudulent accounts during onboarding.
-
Risk policy evaluation: A step that evaluates a risk policy and passes or fails the customer based on its result. Use it to bring built-in and third party fraud signals into the verification flow.
-
Physical document verification: A step for having the highest level of assurance in the real-world identity of someone signing up for your application or organization.
-
Verification data collection & display: Collect or display customer information before the next verification step.
-
Failure message: Add a custom failure message to display when identity verification fails.
After you're done selecting the verification steps, reorder them as needed by dragging and dropping them into the desired sequence.
Workflow preview
View the flowchart to follow along with the current configuration of the identity verification policy. Each connection in the flow reflects the Success action and Failure action settings you've defined for your verification steps.
- Green lines represent successful identity verification paths.
- Red lines represent failed identity verification paths.

Workflow preview with all steps configured properly
When all steps in an identity verification policy are configured with the failure action Next verification step, the flow continues even if each step fails. The identity verification process only stops and exits with Access denied after the final step fails.
For example:
- Address risk evaluation - failed → continues to next step.
- Knowledge-based evaluation - failed → continues to next step.
- Document verification - failed → access denied.
The workflow preview warns you if there's any misconfiguration in the verification flow:
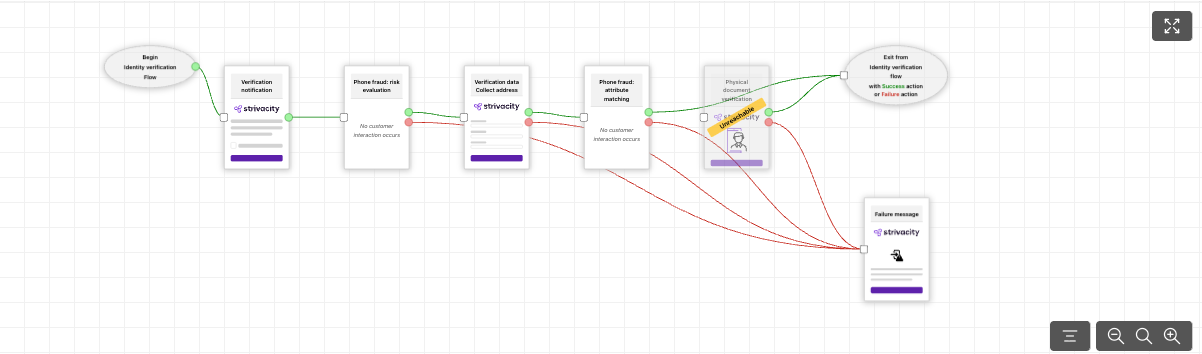
Workflow preview with a misconfigured step
Resolve issues in the verification flow by re-arranging verification steps or by re-considering success and failure actions.
Modifying an existing policy (for example, by renaming it) may affect how reporting and analytics dashboards display historical data.
Historical data is not deleted, but some dashboards may only display information associated with the current version of a policy.
Before making significant changes to a production policy, consider whether reporting continuity is required for your organization.
Updated 8 days ago