Authorization code flow
In the evolving landscape of CIAM, ensuring a seamless and secure user experience is paramount. One effective method is leveraging web views with the OIDC authorization code flow. This approach balances security and usability, making it a preferred choice for many applications. Let’s explore the authorization code flow, the pros and cons of using web views, and how to implement this using the Strivacity mobile SDK.
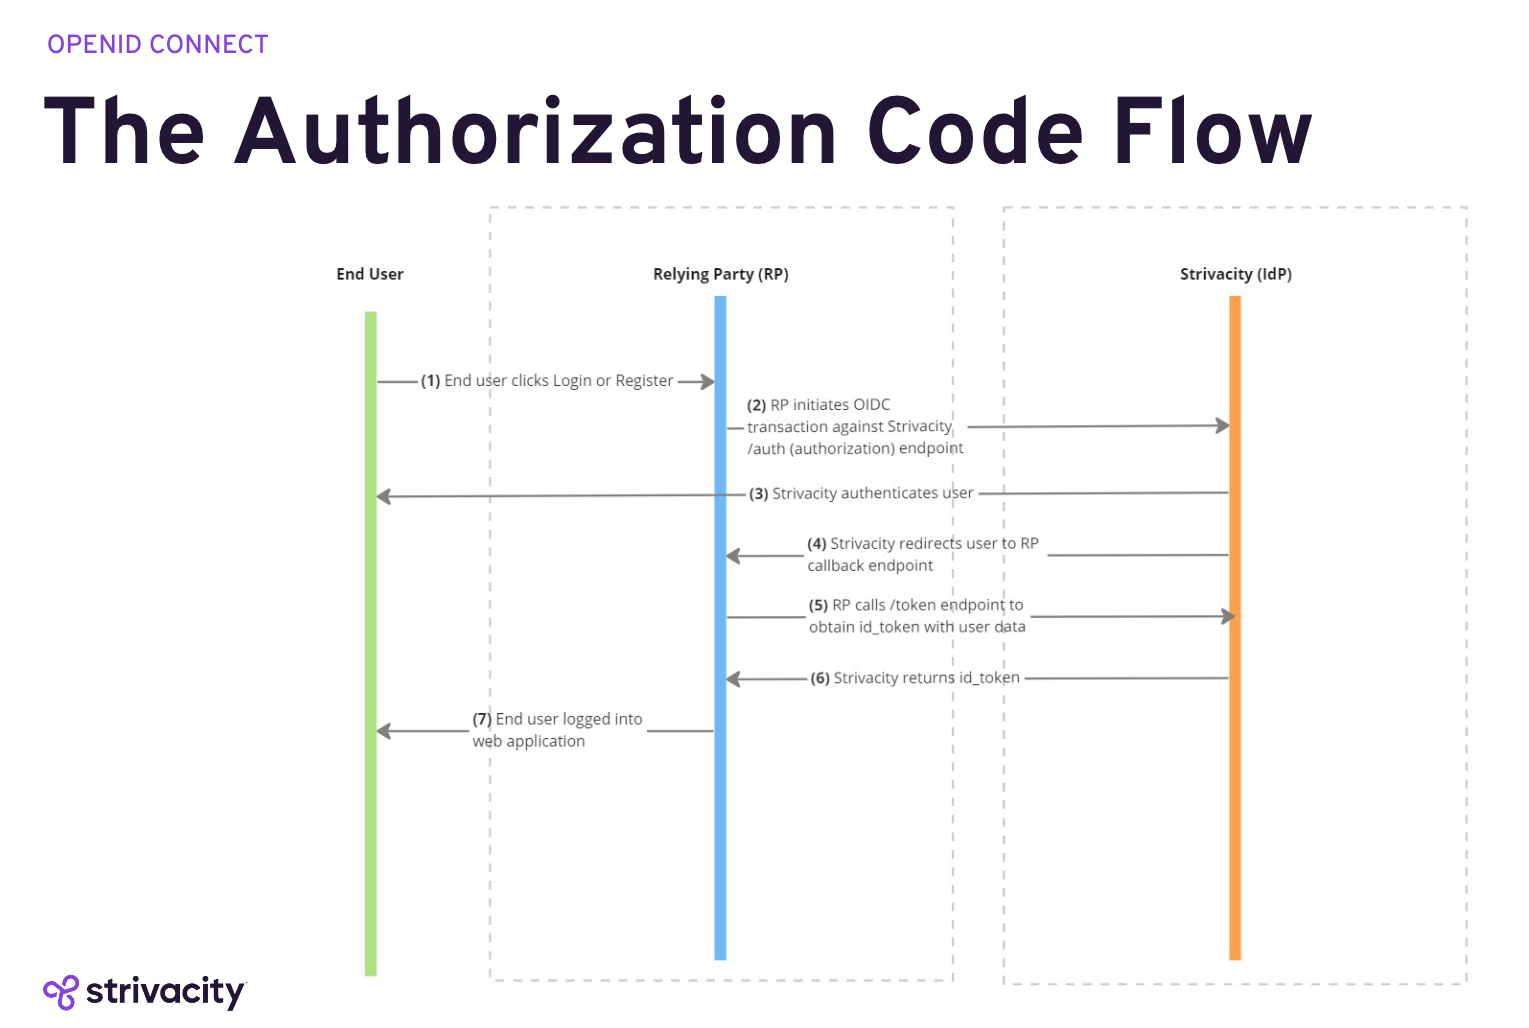
Understanding the authorization code flow
The OIDC authorization code flow is a widely used authentication method that builds on the OAuth 2.0 protocol. It involves multiple steps to ensure the secure exchange of authentication tokens. Here's a step-by-step breakdown of how it works:
- User initiates login: The user attempts to log in through the application, which opens a web view to display the login page hosted by the authorization server.
- Authorization request: The application sends an authorization request to the authorization server. This request includes the client ID, redirect URI, scope, and state.
- User authentication: The authorization server prompts the user to authenticate (e.g., entering credentials or using a biometric scan).
- Authorization code issued: Upon successful authentication, the authorization server redirects the user back to the application with an authorization code.
- Exchange authorization code for tokens: The application sends a request to the authorization server's token endpoint, including the authorization code, client ID, client secret, and redirect URI. The server responds with an ID token and an access token.
- User authenticated: The application uses the ID token to verify the user's identity and the access token to request resources on the user's behalf.
This flow ensures that sensitive credentials are never directly exposed to the application, significantly enhancing security.
Why redirects and web views?
- Consistent user experience: Web views provide a consistent look and feel across different platforms, ensuring that users have a familiar login experience regardless of the device they use.
- Enhanced security: By using web views, authentication occurs on the authorization server's domain, reducing the risk of phishing attacks and ensuring that credentials are not exposed to the application.
- Seamless integration: Web views can easily integrate with various identity providers and leverage existing authentication mechanisms like Single Sign-On (SSO).
- Ease of implementation: Implementing web views for authentication can be straightforward with available SDKs and libraries, reducing development time and complexity due to well-known standards.
- Change management: It's simpler to modify workflows without the need for a new release.
- Avoid API sprawl: The proliferation of APIs typically leads to hidden costs, including reduced developer productivity, more rework, and slower review processes.
How to use SDKs
Strivacity offers iOS & Android [SDKs]; however, any OIDC/SAML-compliant library works. Let’s understand what’s happening under the hood, and for this purpose, we are going to refer to the Strivacity iOS SDK:
- Install the SDK: Add the Strivacity SDK to your project.
- Configure the SDK: Initialize the SDK with your Strivacity client configuration, including client ID, redirect URI, and the authorization server's endpoints.
//iOS let provider = AuthProvider.create( issuer, // specifies authentication server domain redirectUri, // specifies the redirect uri clientId, // specifies OAuth client ID storage // optional, you can provide the storage logic you implemented using Storage interface, or use the default unsecure storage logic ) - Redirect URI: Also known as “custom URL scheme” in the mobile world. This is the location within the application where Strivacity will redirect the user after authentication.
//iOS com.strivacity.sdk.demoapp://redirect - Initiate the authorization flow: Use the SDK to start the authorization flow, which will open a web view for user authentication on its own.
//iOS provider.startFlow(viewController: myViewController) { accessToken, claims in // add success logic here } onError: { error in // handle error } - Strivacity no-code components: Application pops up a web view triggered by the SDK, Strivacity controls the UI/UX and applies the flows configured in the dashboard, for example, 2FA, Consent & IDV.
- Handle the callback redirect: The SDK will handle the redirect back to the application with the authorization code, exchange it for tokens, and notify your application of the authentication result.
- Calling APIs: Using the access token issued, the application can communicate with protected APIs, sending the token in the authorization header.
//iOS provider.getAccessToken { accessToken in // add success logic here } onError: { error in // handle error } - Token validation: APIs (and gateways) are responsible for enforcing the use of the token as well as making sure the user has the right to execute such an operation. Strivacity supports both Opaque and Full JWT tokens:
a. Full JWT tokens: The most common approach nowadays. These are self-contained tokens that can be validated in the client and won’t require an extra API call.
b. Opaque tokens: These tokens are more common for sensitive operations that require a just-in-time validation using introspection.
By following these steps, you can seamlessly integrate OIDC authorization code flow into your mobile application, leveraging the power and flexibility of web views with the security and user experience benefits they provide. The web views and redirects are seamlessly handled by the SDKs, including the “code exchange” and/or “PKCE” when needed.
How to send custom parameters to Strivacity
As a common integration pattern, the application often needs to communicate with the Identity Provider using standards like “acr_values” and “login_hint”; however, sometimes business requirements are beyond what is covered in the open specifications. Let’s take a look at the options offered:
- login_hint: There are 2 options, and they are applicable in different scenarios
- open string: e-mail/username string to pre-fill the identifier and skip the prompt
//iOS provider .withLoginHint("[email protected]") // for defining login hint - JWT encoded: Allows more control on the application since Strivacity can ingest complex payloads, more information here.
- open string: e-mail/username string to pre-fill the identifier and skip the prompt
//iOS
provider
    .withLoginHint("eyJ0eXAiOiDuJ…dLCJhUzI1NiJ9.eyJBlIjoib…bYW5pemxhIn19.")
// for defining complex payload to send via login hint-
scopes: Every application requires a subset of scopes specific to its context. Find out how to represent these attributes using native claims and leverage the specification to let the application decide what to request.
//iOS provider .withScopes("myCustomClaim") // for defining Strivacity native claims -
acr_values: Commonly used to help determine the current application context.
//iOS
provider
    .withAcrValues("myCustomString")  // for defining application context
How to use custom parameters sent to Strivacity
Information transmitted from the application to Strivacity can be accessed via any Lifecycle Event Hooks using the inbound parameter named "oidc_context." This allows for seamless integration of customer-facing applications with various systems or third-party products, utilizing the data provided within the "oidc_context" during different lifecycle events.
module.exports = function ({ application, oidc_context, customer, session, continue_context, continue_request_parameters, account_validation_status }, callback, deny) {
    // implement your logic here
    console.log(JSON.stringify(oidc_context));

    // the following function call does not modify the progressive profiling decisions
    callback(new ProgressiveProfilingOverrides({}, {}, session));
};
How to send a custom parameter from Strivacity to the application
Used to add additional claims where custom business logic is required by fetching data from external systems before the ID and Access tokens are generated. Strivacity provides a Lifecycle Event Hook to provide the most extensibility and fix complex scenarios.
module.exports = function ({ application, oidc_context, customer, session, token }, callback, deny) {
    // implement your logic here
    new_claims = {"claim1": "newClaim0", "claim2": ["newClaim1", "newClaim2"]};
    access_token_extensions = {"key1": "value1"};

    callback(new AdditionalIDTokenData(new_claims, access_token_extensions));
};
Updated 3 months ago