Account management capabilities
Account management in the Admin Console gives support teams tools to manage every aspect of a customer account within a no-code interface. It provides visibility into account details and actions to help resolve issues quickly.
With account management, support teams can:
- Update personal information (account attributes)
- Manage authentication methods (authenticators)
- Review identity verification history
- Check account activity and consent logs
- Adjust group memberships that control access to content
Account listing
Your support team can start assisting customers in the Account management menu in the Admin Console.
Available accounts will be listed by identity stores. You can switch between identity stores using the drop-down on the left. Once you're in the right identity store, you can find accounts by specific parameters by selecting the filter icon on the left.
Account search
Your support team can track down accounts by various parameters using account search and filtering, where you can filter based on identifiers, attributes, date, and membership. The selected search fields will be displayed at the top for easier access until deselected.
You can learn more about search and filtering options here.
Account quick actions
Some actions are available right from the main tab without opening individual account details. When you select one or more accounts in the list, quick actions appear in the header for faster management.
| Icon | Action |
|---|---|
| Delete | Deletes the selected accounts from the identity store. ❗Irreversible action. |
| Add to group | Adds the selected accounts to a group of choice. Available groups will be listed in a new dialog box. |
| Remove from group | Removes the selected accounts from a specified group. Available groups will be listed in a new dialog box. |
| Assign role | Assigns a role to the selected accounts. You must select an organization and role name from the dialog box before confirming. |
| Unassign role | Removes a role from the selected accounts. You must select an organization and role name from the dialog box before confirming. |
| Enable | Enables the selected account(s). The account holder can log in and access their data. |
| Disable | Disables the selected account(s). The account holder can't log in to their account and access their data, but their identity will continue to be stored. |
Account statuses
Account labels allow you to take a quick glance at the status of an account.
| Label | Description |
|---|---|
| Enabled | When an account is enabled, the customers can log in and edit the personal information they have access to. |
| Disabled | When an account is disabled, the customer can't log in to the account. |
| Email has been verified | The email address has been verified through an activation flow. It can be used for sending notifications and, if explicitly registered, as an MFA method. |
| Phone has been verified | The phone number has been verified through an activation flow. It can be used for sending notifications and, if explicitly registered, as an MFA method. |
| Email and phone have been verified | Both the email address and the phone number have been verified through activation flows. They can be used for sending notifications and, if explicitly registered, as MFA methods. |
| External identity | The customer has registered with an enterprise or social identity. Below the customer’s name, Strivacity displays the provider’s logo, provider name, and the associated external identifier. |
| Password locked | The account has been locked out due to too many failed password attempts. |
| OTP locked | The account has been locked out due to too many failed OTP requests. |
| Password, OTP locked | The account has been locked out due to too many failed attempts with both the password and the OTP. |
Hover over the info icon next to the lock status to see why the account was locked and when it happened. This helps you quickly understand the reason without opening the account details.
Email and phone verification
An identifier (email or phone) is considered verified if the customer successfully completed an account activation process using that identifier, either by entering a one-time passcode or by clicking a magic link. In the Admin Console, verified identifiers are marked with a blue check icon.
To learn about the difference between a verified identifier and a confirmed attribute, see the concepts section in our Self-service policy settings documentation.
Failed attempts
This section shows the number of failed login attempts associated with an account:
- Password failed attempts: The number of incorrect password entries.
- OTP failed attempts: The number of incorrect one-time password (OTP) entries.
These counts help support agents identify potential lockout risks and troubleshoot login issues more effectively.
Account overview panel
Important customer information and essential account actions are always readily accessible in account profiles. Account details that identify the customer remain visible as you navigate between tabs.
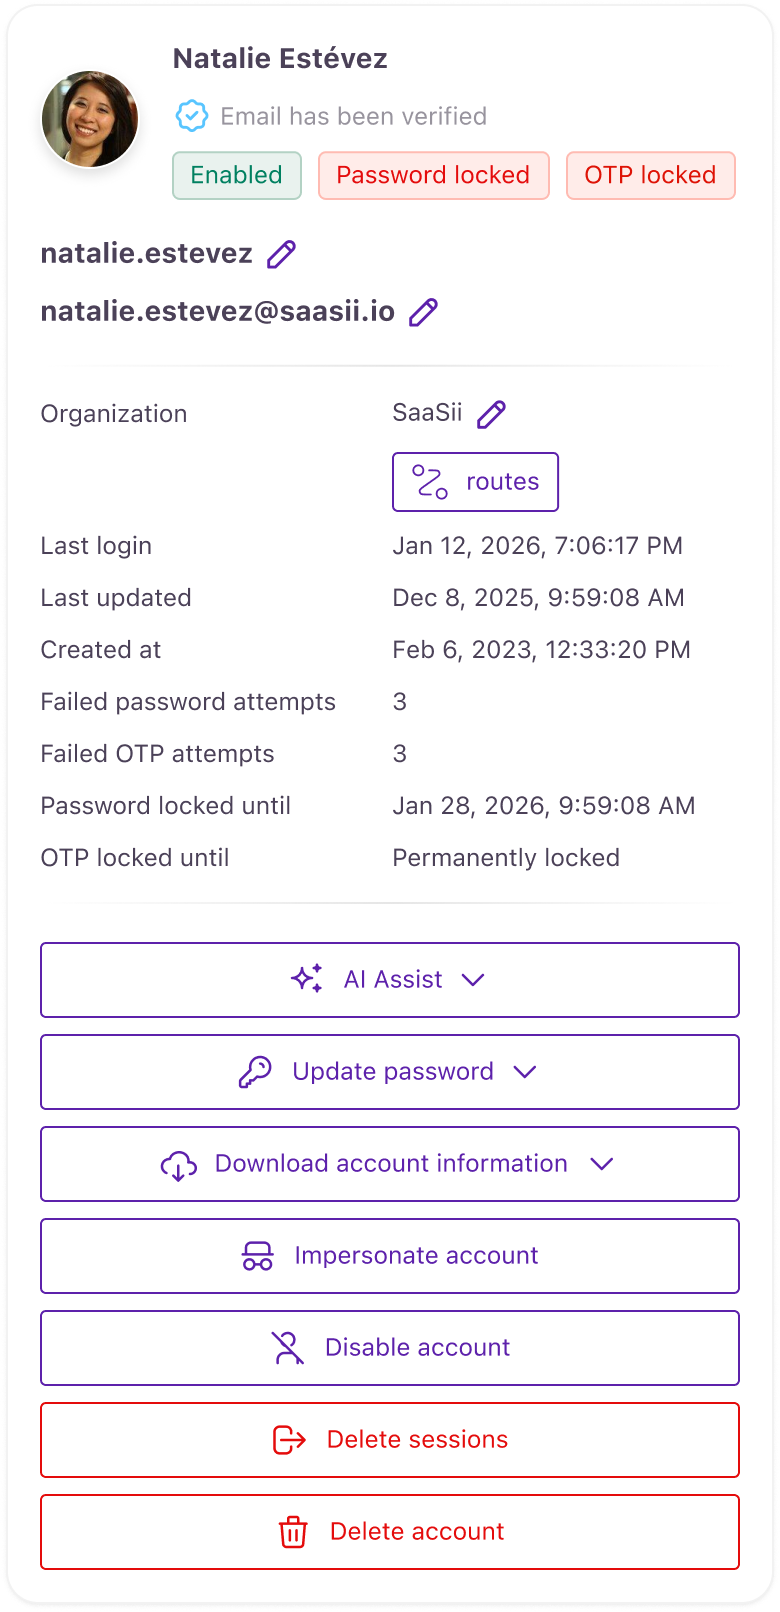
Account overview panel
| Item | Description |
|---|---|
| Organization | If the customer belongs to an organization, it will be displayed here. Select the pencil icon to edit the customer's organization. |
| Last login | The date and time of the last time the customer logged in. |
| Last updated | The date and time the customer's account was last updated. |
| Created at | The date and time the customer's account was created. |
| Failed password attempts | Tracks the number of incorrect password entries on a customer's account. |
| Failed OTP attempts | Tracks the number of incorrect OTP entries on a customer's account. |
| Password locked until | The date and time until password authentication remains locked due to failed verification attempts. |
| OTP locked until | The date and time until OTP authentication remains locked due to failed verification attempts. |
| Disabled at | If the customer's account is disabled, the date and time of the action will be displayed here. |
| AI Assist | Opens AI-powered actions that analyze the account and provide quick insights, such as recent activity summaries, risk signals, or permission details. |
| Update password | Allows customer service to initiate a password reset or manually change the password. |
| Download account information | Customer service can download all the information related to the account in HTML or JSON formats. |
| Impersonate account | Allows customer service to temporarily log in on behalf of a customer. |
| Unlock account | Allows customer service to remove password or OTP locks from an account, letting the customer attempt to sign in again. |
| Disable/Enable account | Customer service can change the status of the account to disabled or enabled. When an account is disabled, the customer can't log into the account. |
| Delete sessions | Customer service can delete active sessions. When a customer returns to their usual browser, they will be required to re-authenticate. |
| Delete account | Customer service can delete the account from the identity store. This is an irreversible action. |
Sensitive actions such as downloading account information and impersonating accounts require the proper administrator role with the proper permissions. Admin roles
Account attributes
Customer service can make changes to an account's basic profile information here.
Attributes can be configured on an identity store basis. Every attribute is available here that's made visible in the Admin Console. Every attribute can be modified where editing in the Admin Console is allowed.
Customers can be notified about this type of update. You can check the Customer notifications section for more information about which branding and notification policies can be applied in different scenarios.
Account event logs
While troubleshooting problems for a customer, your customer service can pull up every event log related to the account in the Activity tab.
For more information, see our detailed description of account event logs.
Notifications
The Notifications tab provides a comprehensive view of all outbound messages sent to a specific customer. This feature is designed to help customer support teams easily understand and trace the notifications delivered, along with their associated details.
Each notification entry includes the following key information:
- Date: When the notification was sent.
- Target: The recipient’s email address or phone number (with SMS/voice call indicator).
- Notification template, policy: The name of the template used for the notification and the policy applied to construct the notification.
- Expiration time: If applicable, the expiration date and time for notifications triggered by time-sensitive content, such as registration or one-time passcode links.
- Notification content: Select the eye icon at the end of a row to view the notification's content. Sensitive information, such as OTPs and magic links, is not displayed.
Notification settings
The Notification settings tab allows administrators to manage a customer's notification preferences.
These settings determine which account-related notifications the customer receives.
Available notification preferences include:
- Account updates
- Account lockouts
- Account deletion
- MFA method changes
- Successful password resets
Administrators can enable or disable individual notification types and select Update to save the changes.
Notification settings can also be managed by customers through the self-service portal when the Allow customers to manage their own notifications option is enabled in the assigned self-service policy.
Groups
Group memberships of an account can be managed here. Every group that the account is a member of is listed.
The account can be added to any group available in the identity store. The account can also be removed from any group.
Removing group memberships will block access for the customer to applications where group restrictions apply.
Roles
The Roles tab contains every role currently assigned to the account.
Multiple roles
An account can take on more than just one type of role.
Cross-organizational permissions
Roles are not restricted to specific organizations: you can grant the same permission to multiple organizations.
Also, an account can have role-based access to any of the organizations living in the identity store. Organizational membership is not required to have permission to a specific organization, only role-pair assignments count.
You can assign a new role with the + Assign role button. A role assignment dialog will open where you can specify the organization and the role you want to assign to the user:
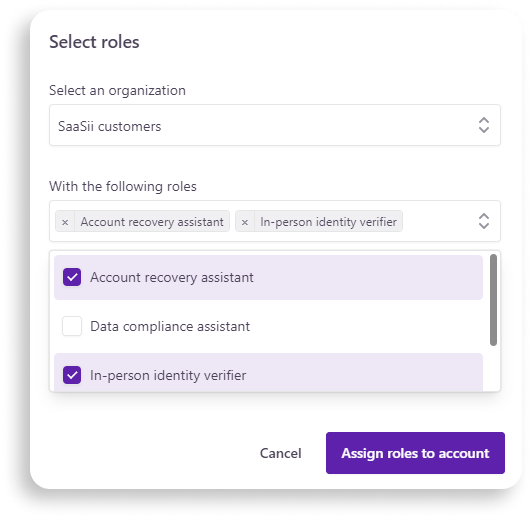
Roles assignment dialog
Authenticators
When customers contact your service desk for help recovering their accounts, your support team is equipped with the right tools to address authentication-related issues. Customers could be facing a variety of challenges, including a forgotten password, identity verification failure, lost authentication devices, or account lockout from too many login attempts.
Customers can be notified about authenticator updates. You can check the Customer notifications section for more information about which branding and notification policies can be applied in different scenarios.
Send password reset email
Customer service can initiate a password reset for an account. The password reset notification will provide the customer with a secure link to self-service reset their password.
Password change
When left with no other option, service desk personnel can opt to change a customer's password directly from the Admin Console.
Add new authentication methods
You can provide customers with secondary authentication methods from the Admin Console. Customer service can also add a new email address or phone number to a customer's account:
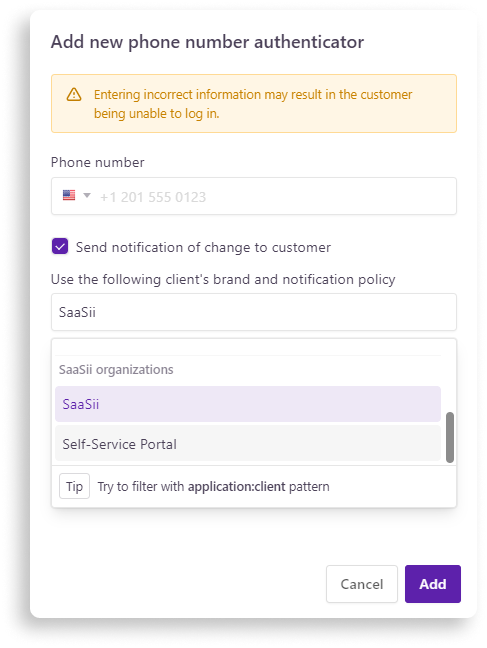
Add new authenticator example: new phone number
Delete an authentication method
If customers lose their mobile devices or can't log in to their email accounts, customer service can help with just a few clicks by removing those methods.
Recognized devices
Customer service can manage the devices from which a customer has successfully logged in.
Available information:
- browser type
- geographic location
- IP address from where the session originated
Devices can be manually removed here. In the event of termination, any access from that browser will cease. If a customer uses that same browser again, they will be required to re-authenticate.
Identity verification
Customer service can manually verify a customer's identity in case the user can't get through the identity verification flow, but your team has ample proof to establish trust in the identity.
- Start by clicking '+ Manually verify identity'.
A popup opens where you can select an identity verification policy. A policy has to be selected to associate a verification receipt to the account.
- Select the identity verification policy the user failed to complete.
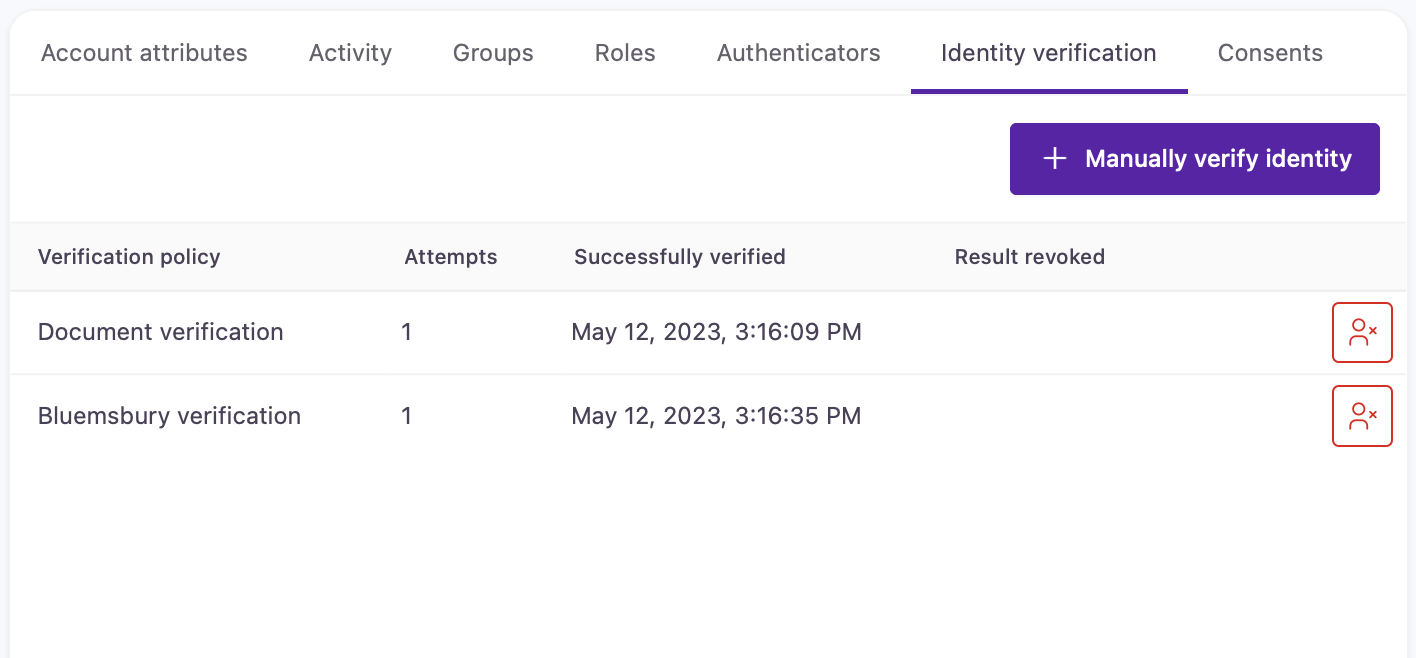
Revoke verificationIdentity verification can also be revoked in case the identity carries a risk. You can revoke a verificaiton by clicking on the icon with the red outline at each entry.
Consents
Here, your team can access the consent history of the account. You can get access to this data from account information download files to satisfy data requests according to your regulatory and privacy standards.
The consent log contains
- the list of consents customers have agreed to,
- the time of the agreement,
- and the time of opt-out for outdated consent versions or manually revoked consents.
Authorization consents
Here, your team can see the customer's authorization consents: which AI agents and Applications they've authorized to access their account. Each entry shows the client, the resource it accesses, the scopes it covers, and which of them the customer accepted. When a customer asks you to cut off an agent's access, open the entry's action menu and select Revoke consent.
Customer notifications
Customer service can notify customers about the changes made to their account, whether it's an update to profile information or enrollment of new authenticators. In every case, a client needs to be selected to send the notification.

Customer notification dialog
Changes take immediate effect.
This guide indicates which support actions notifications are available for.
About clients
Clients provide customer journeys: customers get access to their accounts through them. The policy configurations you apply to applications and/or organizations are implemented by clients. However, configurations apply conditionally to clients: the experience customers will ultimately see on their screens doesn't only depend on what's assigned to the application but also on the type of account using that client.
Scenario #1: If the customer is part of an organization, then only clients that belong to organizational applications, in general, can be selected. In this case, the customer experience (in this case, branding and notifications) of the client is determined by the organization that the account is part of.
Scenario #2: If the customer is not part of an organization, then only clients that belong to non-organizational applications will be listed. In this case, the branding and the notification policy of the application will apply to the notification.
Updated 15 days ago