Application settings
A Strivacity application is a collection of policies and configurations that define how customers interact with your brand's protected resources: signing in, registering, and managing their accounts. This page covers the required and optional configuration options available when creating or editing an application.
Strivacity supports three application types: simple, organization-only, and hybrid. Mandatory settings and most other configuration options apply across all types.
General tab
When creating a new application, some basic settings must be configured to save the application.
- Name: This is the name of the application as it appears in the Admin Console.
- Description: You can optionally add a description to provide context about the application's purpose.
- Policy tag: Tags can be used to organize, filter, and control access to applications.
- Identity store: Each application must be linked to an identity store that holds its customer and administrative identities.
For organization-enabled applications, the identity store cannot be changed after the application is created.
The following options let you tailor how your application works and integrates with other systems.
Group restriction (within identity stores)
Group restriction controls which groups within the identity store can access the application. Group data can also be passed to your brand portal in tokens and assertions.
IdP session management
IdP session management controls how Strivacity maintains a shared identity provider (IdP) session across multiple application clients in the same browser. When enabled, this allows customers to move between OIDC and SAML applications without re-authenticating, even if they did not select Keep me logged in.
This capability provides seamless cross-application SSO within the same browser. When enabled, an IdP session is implicitly applied, regardless of the Keep me logged in checkbox selection.
IdP SSO applies only between applications within an instance where this setting is enabled.
To enable seamless SSO between multiple applications, IdP session management must be turned on for each participating application.
Automatic account selectionWhen IdP SSO is enabled, Strivacity attempts to automatically identify the customer account before prompting for interactive identification.
In these scenarios, the interactive account identification step is skipped:
- If a login hint is provided, Strivacity uses the account specified by the login hint.
- If no login hint is provided and there is only one valid IdP SSO session available for the application, Strivacity automatically selects that account.
- If no login hint is provided and multiple valid IdP SSO sessions are available for the application, Strivacity automatically selects the account that was used most recently.
- Enable IdP SSO session: Enables or disables single sign-on (SSO) across applications using the same browser. When enabled, users can sign in once and access multiple applications without re-authenticating. When disabled, users must authenticate separately for each application based on its own session settings.
- IdP SSO inactivity timeout: Specifies how long a user can be inactive before their SSO session expires. If IdP SSO keep-alive is enabled, this timer resets with user activity. If disabled, the session expires after this period, even if the user is active.
- IdP SSO keep-alive: Determines whether user activity extends the SSO session. When enabled, each interaction resets the inactivity timeout. When disabled, the session expires after a fixed duration regardless of activity.
- IdP SSO max session lifetime: Sets the maximum total duration of an SSO session. Once this limit is reached, the user must sign in again, even if they have been active. This prevents sessions from lasting indefinitely.
Default IdP session management configuration
Strivacity applies the following values by default:
| Setting | Default value |
|---|---|
| Enable IdP SSO session | turned off |
| IdP SSO inactivity timeout | 70 minutes |
| IdP SSO keep-alive | turned on |
| IdP SSO max session lifetime | 480 minutes |
Identifier and device session management
Identifier and session management settings let you configure how customer account identifiers and login sessions behave across visits.
Remember account identifiers after the session ends
This setting controls whether and how a customer's account identifier is remembered across sessions.
Available options:
- Always remember identifiers: The customer's identifier is always remembered when logging back in from the same device or browser.
- User chooses to remember - checked by default: A Remember me checkbox appears for the customer. It's pre-checked by default.
- User chooses to remember - unchecked by default: Customers see the Remember me checkbox, and it is unchecked by default.
- Never remember identifiers: Identifiers are not remembered. Customers must always re-enter them.

Local identity screen with the "Remember me" option
Keep me logged in
This setting determines how Strivacity handles long-lived authentication sessions.
The Keep me logged in option appears on the primary authenticator screen:
- On the password screen, if the flow includes a password.
- On the MFA screen in passwordless flows.
When selected, a kept authenticator is stored in the device session and may allow seamless SSO across applications, depending on policy configuration.
This is configured as a dropdown with four options:
- Always keep users logged in: The Keep me logged in checkbox is not shown to customers. Sessions are preserved automatically until timeout.
- User chooses - checked by default: Customers see the Keep me logged in checkbox, and it's checked by default.
- User chooses - unchecked by default: Customers see the Keep me logged in checkbox, and it's unchecked by default.
- Never keep users logged in: The Keep me logged in checkbox is not shown. Customers must always re-enter their password if the application requires re-authentication.
If Keep me logged in is not available, long-lived device sessions are not created. Session expiration then follows token and application timeout settings.
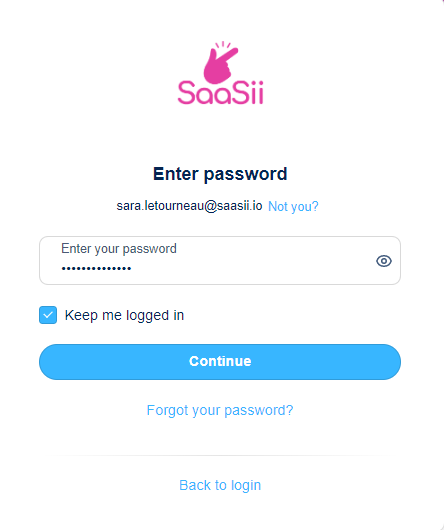
Password screen with "Keep me logged" in option
Allow users to select "Keep me logged in" and "Remember my device" even if they choose not to remember identifiers
This setting controls whether the Keep me logged in and Remember my device checkboxes are shown to the customer, even when the identifier is not remembered.
When this option is enabled, these choices remain visible and functional during authentication steps regardless of the identifier memory settings. The actual behavior of Remember my device still depends on the Adaptive access policy configuration.
In passwordless flows, the Keep me logged in option may appear on the MFA screen, since MFA acts as the primary authenticator.
If this setting is disabled and the identifier is not remembered, the customer won't see the Keep me logged in or Remember this device options.
For details on how Fastpath is triggered and how each authentication step can be skipped, see the Fastpath.
Device session inactivity timeout
Device session inactivity timeout defines how long a device session can remain idle before re-authentication is required.
If a kept authenticator exists and the customer returns within the inactivity window, the session continues, and the timeout resets. If the inactivity threshold is exceeded, authentication is required again.
Device session max lifetime
Device session max lifetime defines the absolute lifespan of a device session. Once this maximum is reached, the customer must re-authenticate, even if the inactivity timeout has not expired.
To enforce a maximum lifetime, toggle Enable max device session lifetime.
Default identifier and device session management configuration
Strivacity applies the following values by default:
| Setting | Default value |
|---|---|
| Remember account identifiers after session ends | Always remember identifiers |
| Keep me logged in | User chooses - unchecked by default |
| Allow users to select "Keep me logged in" and "Remember my device" even if they choose not to remember identifiers | turned off |
| Device session inactivity timeout | 168 hours (7 days) |
| Enable max device session lifetime | turned off |
| Device session max lifetime | 43200 minutes (30 days) |
Login flow management
Login session max age
This setting defines how long the login or registration flow stays active before the session expires. If the customer doesn’t complete the journey in time, they’ll see a “session expired” message. The default value is 5 minutes.
Consent management
You can assign consent statements to collect customer agreement for specific terms. For more, see Assigning a consent to an application.
Lifecycle event hooks
Lifecycle Event Hooks (LEH) provide a method to integrate your customer-facing applications with homegrown systems and third-party products.
Once created and tested, you can assign a hook to an application to activate it.
Policies tab
Policies control the customer experience and behavior of your application. You can assign existing policies from a drop-down list.
A policy is a group of reusable common settings that can be assigned to an application. You can reuse the same policy by applying it to multiple applications.
Adaptive access policy
Defines the login workflow, access rules, and MFA requirements for the application.
Identity verification policy
Allows you to confirm the identity of your customers by applying document-centric and data-centric methods.
Self-service policy
Specifies what customers can do on their own, such as registering, recovering access, or managing their account.
Branding policy
Applies logos, colors, and other brand elements to customer-facing experience.
Notification policy
Defines notification content that customers receive.
Login providers tab
These settings define how customers authenticate with your application.
Local login
If enabled, customers can sign in using credentials stored in your Strivacity identity store.
You can disable local login to rely only on external identity providers. If disabled:
- The login screen won't show username or email fields.
- The "forgotten username" option won't be available.
- Customers won't see any remembered accounts.
External login
Enable customers to sign in using enterprise or social identity providers.
Strivacity supports multiple social or enterprise login provider integrations.
Forward customers to an external provider
If only one external provider is configured, you can automatically redirect customers to the provider's login page, bypassing the Strivacity login screen entirely.
Clients tab
Learn more in our Application clients documentation.
A/B testing tab
Learn more in our A/B testing documentation.
Updated about 1 month ago